How to Make Appetizing Spicy Cucumber Salad
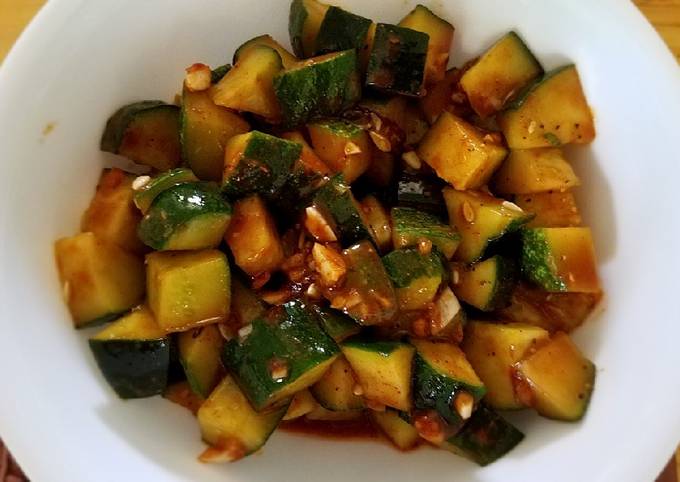
Spicy Cucumber Salad.
 Spicy Cucumber Salad highly diverse and have ideal sense that unique. Some types of Spicy Cucumber Salad recipes are also adequate easy to process and do not pick up lengthy. Though not everyone likes Spicy Cucumber Salad food, now some people are getting attached and like the various Spicy Cucumber Salad foods available. This can be seen than the number of restaurants that supply Spicy Cucumber Salad as one of the serving. You can cook Spicy Cucumber Salad using 9 ingredients and 2 steps. Here is how you achieve it.
Ingredients of Spicy Cucumber Salad
- You need 2-3 of pickling cucumbers or 1 English cucumber.
- Prepare 1 of garlic cloves, minced.
- Prepare 1 tsp of Korean hot pepper paste.
- Prepare 2 tsp of Duenjang paste or miso paste.
- You need 1 tsp of tamari sauce.
- You need 1 tsp of honey, optional.
- It's 1 pinch of Onion powder.
- You need 1 pinch of black pepper.
- Prepare 2 tsp of toasted sesame oil.
Spicy Cucumber Salad instructions
- Dice cucumbers and set them aside..
- In a small mixing bowl, mix together all seasonings. Pour the diced cucumber into the seasoning bowl. Coat the cucumber with the seasoning sauce. Serve as a side dish..
Obtain ingredients for production Spicy Cucumber Salad recipes is also not tough. You can easily get the main ingredients at the nearest supermarket and even on the market. There are much kinds of Spicy Cucumber Salad that are simple and fast to process into delicious dishes. You can always practice this Spicy Cucumber Salad recipe at home, and can provide it to your children and extended family. If you wish to cook different foods on our website, we supply sundry types of food recipes which are of course very delicious and enjoyable to enjoy, please try them.
How to Make Delicious Whiskey Smoked Tri-Tip Sandwhich
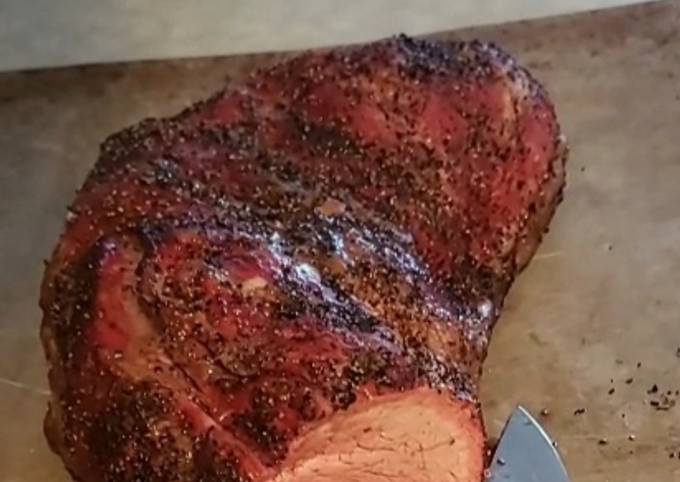
Whiskey Smoked Tri-Tip Sandwhich.
 Whiskey Smoked Tri-Tip Sandwhich very diverse and have mind flavor that unique. Few types of Whiskey Smoked Tri-Tip Sandwhich recipes are also enough convenient to process and dont take long. Even though not everybody likes Whiskey Smoked Tri-Tip Sandwhich food, nowadays some people are getting attached and like the sundry Whiskey Smoked Tri-Tip Sandwhich foods on hand. This can be seen from the number of restaurants that prepare Whiskey Smoked Tri-Tip Sandwhich as one of the serving. You can cook Whiskey Smoked Tri-Tip Sandwhich using 30 ingredients and 20 steps. Here is how you cook that.
Ingredients of Whiskey Smoked Tri-Tip Sandwhich
- It's of TRI-TIP.
- It's 2 lbs of cut of Tri-Tip.
- You need 1/2 cup of Kosher Salt.
- Prepare 1/2 cup of Black Pepper.
- It's 1 tbspn of Unsalted Butter.
- It's of Sub rolls or hamburger buns.
- You need of BBQ Sauce (Based on Aaron Franklin's Recipe).
- It's 2 tbsp of beef tallow (vegetable oil for a vegan option to share).
- Prepare 1/3 of white onion roughly cut.
- It's 4 of garlic cloves roughly cut.
- Prepare 1 cup of light brown sugar.
- You need 1.5 cups of organic ketchup.
- It's 1 tbsp of kosher salt.
- It's 1.5 tbsp of pepper.
- You need 1 cup of Apple Cider Vinegar.
- It's 1 tsp of mustard powder.
- It's 2 tsp of smoke paprika.
- Prepare 4 dashes of Worcestershire Sauce.
- You need of Whiskey Basting Sauce.
- It's 5 tbsp of BBQ sauce from previous section.
- Prepare 1-2 shots of your favorite Bourbon/Whiskey (preferably American).
- Prepare of Cookware.
- You need of Smoker loaded with your favorite smoke flavor (hickory here).
- You need of Sauce Pan.
- Prepare 1 of large bowl with an airtight lid.
- It's 1 of small bowl.
- You need of Basting brush.
- Prepare of SUB: Oven if you do not have a smoker (needs a cooling rack).
- It's of Blender.
- It's of Cast Iron Fry Pan or Cast Iron Skillet.
Whiskey Smoked Tri-Tip Sandwhich step by step
- Grab your Tri-Tip and spread an even coating of Kosher, make sure to cover every side. Does not need to be the full cup, be cautious of over salting meat. This step is important in creating the dry brine. After you have salted, spread an even layer of pepper on the meat, make sure to cover every side..
- Place seasoned Tri-Tip on a cooling rack or on a cookie tray under plastic wrap (cooling rack does not need this) inside of the refrigerator for about 2.5 hours (Do this overnight or start earlier in the morning for more flavorful meat)..
- Heat your saucepan under medium-high heat. Once heated drop the 2tbsp of beef tallow, vegetable oil, or other fat into your pan. Quickly pour your chopped onions in after. Cook for 6 minutes or until Onions are translucent..
- Once your onions are translucent. Drop you chopped garlic cloves into your sauce pan and cook for an additional 4 minutes..
- After the 4 minutes is up, you then put in your 1 cup of light brown sugar and begin stirring with a plastic or wooden spoon. You keep stirring your sugar until it caramelizes and becomes like a glaze..
- Drop your ketchup, mustard powder, salt, pepper, and smoke paprika at this time and begin stirring until you notice a color change then bring it up to a simmer. Let sit in this state for 5 minutes or until the sauce is thick..
- After the sauce has thickened, stir in your Worcestershire sauce. Once stirred in, let the sauce simmer for one more minute..
- Transfer sauce into blender and blend on high until all of the onions and garlic has been blended into the sauce. Pour sauce into the large bowl with an airtight lid, seal it and let it sit out until it has cooled to room temperature..
- After about 2 hours of waiting, begin warming up your smoker/oven to about 275°F. While your smoker/oven is heating up, pull your Tri-Tip from the refrigerator and let it begin warming up to room temp for the next 15-30 minutes (often times this isnt enough to raise the temp of the meat straight out of the fridge but it is alright to put it in between this time frame)..
- Once your smoker/oven is warm and your meat has warmed up in the open for about 15-30 minutes, put the Tri-Tip in your smoker/oven. I recommended cooking the Tri-Tip on a cooling rack in your oven with tinfoil on the bottom of the oven in order to ensure that it is cooked evenly around. An issue that is not held by conventional smokers..
- Maintain the temperature at about 250°F for the next hour and do not open the cooking chamber..
- After maintaining temps for an hour, without opening your cook chamber, begin ramping the temperatures up to 275°F. Once you ramp your temperatures, head back to your now cool BBQ sauce and take out 5 tbsp and place them into your small bowl. Reseal your large bowl and place in fridge. Take your small bowl and pour about 1 shot of your favorite bourbon/whiskey in and mix. You now have your bourbon/whiskey BBQ basting sauce..
- When the internal temperature of the biggest part of the Tri-Tip hits the internal temperature of 100°F (about 1.5 hours of cooking) begin basting your Tri-Tip with your Bourbon/Whiskey BBQ sauce that you just made and dont be afraid to apply a liberal coating..
- Once your done with that let the Tri-Tip continue cooking for about another 30 minutes at 275°F..
- Once you hit the 2 hour mark or start getting within 10-7°F of the internal temperature that you want, begin heating up your cast iron fry pan/skillet on your stove and place the heat on high..
- Right before you pull your Tri-Tip out of the smoker/oven, drop 1 tbsp of unsalted butter into your pan. Remove your Tri-Tip and begin cooking all sides of it (butter should be melted by now)..
- The Tri-Tip should spend, at most, 1 minute on each side in order to give it a nice sear and crust. Once all sides are done, baste with butter for 30 seconds and then take off..
- Allow meat to rest for at least 15 minutes. This allows the meat to finish cooking as well as buying you time to finish any sides you may have yet to finish..
- Serve with Tri-Tip itself on the bun or with a dab of BBQ sauce on the top bun. My favorite way to eat it is to place coleslaw on top of the meat with a dab of BBQ sauce on the top bun. Use the BBQ sauce you made as the pepper should pair nicely with the savory taste that the whiskey and smoke bring. If you try it with coleslaw, it brings a cool element and really helps balance out the flavors even more..
- Enjoy! Remember you can store your homemade sauce I fride for upto a month..
Obtain ingredients for manufacture Whiskey Smoked Tri-Tip Sandwhich recipes is also not tough. You can easily get the main ingredients at the closest supermarket and indeed on the market. There are many types of Whiskey Smoked Tri-Tip Sandwhich that are convenient and quick to process into delicious dishes. You can constantly practice this Whiskey Smoked Tri-Tip Sandwhich recipe at home, and can serve it to your children and extended family. If you wish to cook different foods on our website, we prepare various types of food recipes which are of course very delicious and enjoyable to enjoy, please try their.
How to Cook Yummy Tom Yam Goong
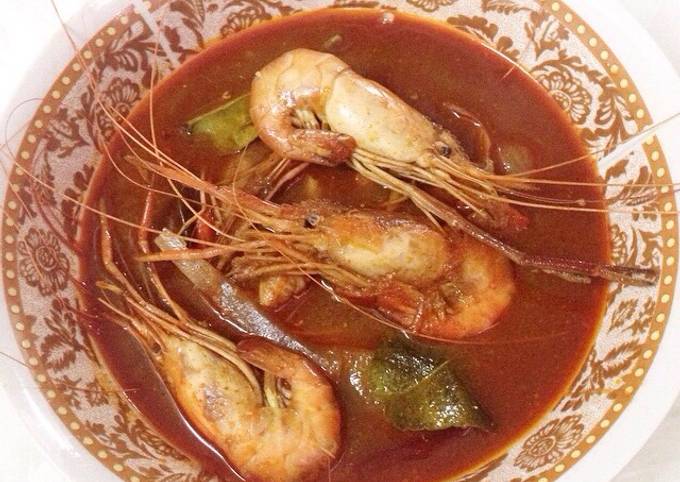
Tom Yam Goong.
 Tom Yam Goong most diverse and own mind sense that unique. Several kinds of Tom Yam Goong recipes are also enough easy to process and do not take lengthy. Even though not everyone likes Tom Yam Goong food, nowadays some people are got attached and like the sundry Tom Yam Goong foods on hand. This can be visible from the number of restaurants that provide Tom Yam Goong as one of the dish. You can cook Tom Yam Goong using 17 ingredients and 4 steps. Here is how you achieve that.
Ingredients of Tom Yam Goong
- You need of yellow onion (sliced).
- You need of kaffir lime leaves.
- It's of lime juice.
- It's of lemongrass (sliced).
- Prepare of coriander's stem shoot.
- Prepare of baby carrots (sliced).
- Prepare of birds eye chilli (sliced).
- You need of dried chilli (cut into pieces).
- Prepare of tiger prawn (washed).
- You need of chicken (cubed).
- Prepare of tomato.
- Prepare of oyster mushroom.
- It's of Few pieces of coriander leaves.
- You need of Thai Chilli Paste (Tomyam paste Nyonya brand).
- You need of small ladle of evaporated milk (F&N brand).
- You need of fish sauce (Knife brand).
- Prepare of water.
Tom Yam Goong step by step
- Bring the water to boil along with onion, coriander stem, lemongrass, kaffir lime leaves, chilli, dried chilli and carrots..
- When boiling, add the tomyam paste, evaporated milk, and fish sauce. Salt and sugar(if needed) to taste. Add the chicken as well..
- When chicken almost cooked, add the tiger prawns, oyster mushroom,tomato and lime juice..
- Serve hot with Thai fragrant rice..
To get ingredients for making Tom Yam Goong recipes is also not tough. You can easily get the main ingredients at the closest supermarket and in fact on the market. There are many types of Tom Yam Goong that are simple and quick to process into delicious serving. You can constantly practice this Tom Yam Goong recipe at home, and can serve it to your children and extended family. If you want to cook different foods on our website, we provide various types of food recipes which are of certainly very delicious and enjoyable to enjoy, please try them.
Easiest Way to Cook Appetizing Orange Celeriac - Turkish Homemade Cooking
Orange Celeriac - Turkish Homemade Cooking. Turkish style Celeriac Recipe with quince and citrus flavors is a great way to include this ugly looking but healthy vegetable to your diet. Turkish Style Celeriac Recipe with carrot and quince flavored with lemon and orange juice make a wonderful side dish or a vegetarian meal. They go down well as little homemade gifts hence the bright idea of lemon curd!.
 Celeriac or celery root is grown like celery during the cool season. Though it can be found all winter, it is best in the fall, just after being dug up. Celery Root Cooking Tips: Because the roots and dirt-filled crevices have to be trimmed away, you will lose at least a quarter, if not more, of the celeriac during. Orange Celeriac - Turkish Homemade Cooking most diverse and have mind flavor that unique. Few kinds of Orange Celeriac - Turkish Homemade Cooking recipes are also enough simple to process and dont take lengthy. Although not everyone likes Orange Celeriac - Turkish Homemade Cooking food, currently several people are getting attached and like the various Orange Celeriac - Turkish Homemade Cooking foods available. This could be visible than the number of restaurants that supply Orange Celeriac - Turkish Homemade Cooking as one of the dish. You can have Orange Celeriac - Turkish Homemade Cooking using 13 ingredients and 8 steps. Here is how you cook it.
Ingredients of Orange Celeriac - Turkish Homemade Cooking
- It's 1 of Celeriac (Knob Celery).
- You need 1 of Onion.
- It's 1 of Potato.
- It's 1 of Carrot.
- It's 40 grams of Green peas.
- It's 1 tsp of Sugar.
- It's 1/2 tsp of Salt.
- It's 1/2 of orange ★Orange (squeezed juice).
- Prepare 1/2 of lemon ★Lemon (squeezed juice).
- You need 50 ml of ★Olive oil.
- Prepare 1 of slightly under 750 ml ★Water.
- It's 1 of Dill (optional).
- Prepare 1 tbsp of Olive oil (for stir frying).
Celery is a ubiquitous ingredient in American cookery, near and dear to many home cooks, but celeriac Celery and celeriac are basically the same plant, Apium graveolens, with celeriac being a variety cultivated for its root rather than for its stalks (var. rapaceum). Buy delicious freshly made Ottolenghi products, hard to find pantry ingredients and signed books from our online store, delivered worldwide. Celeriac and lentils with hazelnuts and mint. Baked dakos with spiced chickpeas, tomato and feta.
Orange Celeriac - Turkish Homemade Cooking instructions
- Mince the stalks and stems of the celery. Cut the root into 3-4 cm cubes. ※The larger the pieces are, the softer and flakier they become..
- Thinly slice the onion and cook in the frying pan. Once tender, add the 1.5cm cubes of potato and carrot..
- Once cooked, add the green peas, sugar, and salt for flavor..
- Place the celeriac in a pot. Add the stir-fried vegetables on top..
- Top with the minced celery leaves and stalks..
- Add the ★ ingredients, cover with a lid, and simmer for 15-20 minutes..
- Once the vegetables have softened, arrange on a dish and garnish with dill..
- It's done..
Cooked, it sweetens, and tastes a little like a parsnip that fell in with some celery ribs. It is often mashed and mixed with mashed potatoes, but I enjoy it all on its own, mashed with some butter and milk or cream. It's a perfect side for lamb, steak, or chicken. Learn how to make Jujubes (Turkish) recipe using our easy to make homemade Jujubes (Turkish) recipes. Try this homemade Jujubes (Turkish) cooking recipe at your This pudding is a perfect treat plain, but you can turn it into an elegant dessert by adding some nuts, fresh fruit, lemon or orange zest.
Obtain ingredients for manufacture Orange Celeriac - Turkish Homemade Cooking recipes is also not tough. You can easily get the main ingredients at the nearest supermarket and even on the market. There are ample types of Orange Celeriac - Turkish Homemade Cooking that are easy and quick to process into delicious serving. You can constantly practice this Orange Celeriac - Turkish Homemade Cooking recipe at home, and can presenting it to your children and extended family. If you wish to cook different foods on our website, we prepare various types of food recipes which are of course very delicious and enjoyable to enjoy, please try their.
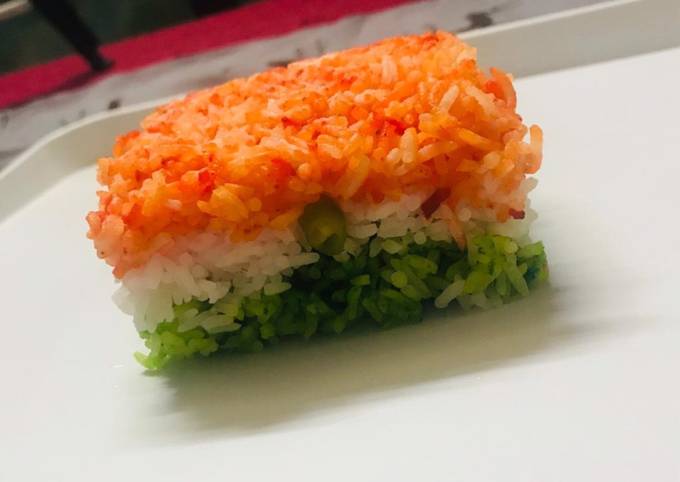
Easiest Way to Prepare Perfect SWEET TRICOLOUR RICE!🇮🇳
SWEET TRICOLOUR RICE!🇮🇳. It's a special recipe by my mother prepared for special festivals like Holi ,Durga Puja and Diwali- so friends just check it out and enjoy 🇮🇳🤘 Music Credit. Lightened Up Sweet Coconut Rice Recipe My first introduction to Sweet Coconut Rice was not very long ago but my love for Sweet Rice is pretty deep Tricolour Sweet Medley -Layers of gajar ka halwa, white chocolate phirni and green pea phirni to represent our national flag.
 Independence day Special Tricolour sandwich recipe. I have used two veggies in each layer to make the sandwich to Tiranga Pulao is the series of Three colors or tricolour pulao recipe which have all unique flavors of Rice. Celebrate Republic Day With These Delicious Tricolour Recipes! 😋🇮🇳. Режиссер: Майк Кэхилл. В ролях: Оуэн Уилсон, Сальма Хайек, Неста Купер и др. Язык: RU. SWEET TRICOLOUR RICE!🇮🇳 very diverse and own mind taste that unique. Few types of SWEET TRICOLOUR RICE!🇮🇳 recipes are also enough convenient to process and do not pick up lengthy. Though not everybody likes SWEET TRICOLOUR RICE!🇮🇳 food, now several people are getting attached and like the various SWEET TRICOLOUR RICE!🇮🇳 foods on hand. This could be visible of the number of restaurants that provide SWEET TRICOLOUR RICE!🇮🇳 as one of the dishes. You can cook SWEET TRICOLOUR RICE!🇮🇳 using 3 ingredients and 3 steps. Here is how you achieve that.
Ingredients of SWEET TRICOLOUR RICE!🇮🇳
- Prepare 7-8 tablespoon of sugar.
- It's 2 bowl of rice.
- Prepare of Some orange and green food colour.
Tricolour Savory Rice Cake by Femina Sherif. Presenting before you an egg free, butter free and gluten free Savory Rice Cake! Layers of spicy cakes bound together by flavored chutneys. Also called glutinous rice or sticky rice, it can be found at Asian food stores and well-stocked supermarkets.
SWEET TRICOLOUR RICE!🇮🇳 step by step
- Take 2bowl cooked rice, now add about 7-8 tablespoon sugar and mix well..
- Now devied the rice into 3parts and add orange and green food colour to 2different parts and let the 3rd remain same..
- Now in a square container put the rice in the tri colour order and keep it in for 3mins now take it out in a plate and serve!!.
Watch short videos about #tricolour🇮🇳 on TikTok. To make sweet rice, combine the rice and sugar in a bowl, mix well and keep aside. If you wish you can add a little edible yellow colour to get the perfect. Sweet Fermented Rice, or jiu niang (酒酿), is a versatile Chinese specialty that can be added to both sweet and savory dishes. For savory dishes, use the sweet fermented rice to replace sugar for a balanced natural sweetness.
Got ingredients for making SWEET TRICOLOUR RICE!🇮🇳 recipes is also not hard. You can easily get the main ingredients at the closest supermarket and indeed on the market. There are many kinds of SWEET TRICOLOUR RICE!🇮🇳 that are convenient and fast to process into delicious dishes. You can always practice this SWEET TRICOLOUR RICE!🇮🇳 recipe at home, and can presenting it to your children and extended family. If you want to cook another foods on our website, we supply various types of food recipes which are of certainly very delicious and enjoyable to enjoy, please try they.
Recipe: Perfect The BEST Pineapple Fried Rice Recipe in a Pineapple Bowl •How to Make Pineapple Bowl |ThaiChef Food
The BEST Pineapple Fried Rice Recipe in a Pineapple Bowl •How to Make Pineapple Bowl |ThaiChef Food.
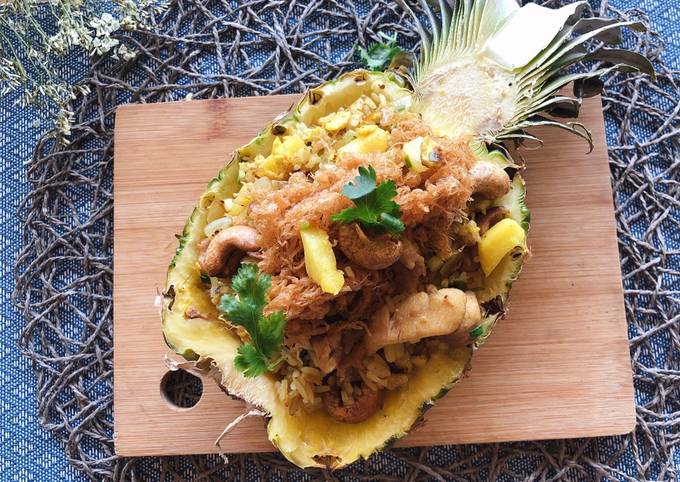 The BEST Pineapple Fried Rice Recipe in a Pineapple Bowl •How to Make Pineapple Bowl |ThaiChef Food very diverse and own ideal sense that unique. Several types of The BEST Pineapple Fried Rice Recipe in a Pineapple Bowl •How to Make Pineapple Bowl |ThaiChef Food recipes are also sufficient simple to process and dont take lengthy. Even though not everyone likes The BEST Pineapple Fried Rice Recipe in a Pineapple Bowl •How to Make Pineapple Bowl |ThaiChef Food food, currently few people are get attached and like the various The BEST Pineapple Fried Rice Recipe in a Pineapple Bowl •How to Make Pineapple Bowl |ThaiChef Food foods on hand. This can be seen from the number of restaurants that provide The BEST Pineapple Fried Rice Recipe in a Pineapple Bowl •How to Make Pineapple Bowl |ThaiChef Food as one of the serving. You can have The BEST Pineapple Fried Rice Recipe in a Pineapple Bowl •How to Make Pineapple Bowl |ThaiChef Food using 12 ingredients and 2 steps. Here is how you achieve it.
Ingredients of The BEST Pineapple Fried Rice Recipe in a Pineapple Bowl •How to Make Pineapple Bowl |ThaiChef Food
- You need 1 pc. of Pineapple.
- You need 45 g. of Pineapple meat.
- It's 2 tsp. of Pineapple juice.
- Prepare 120 g. of Chicken thigh.
- It's 350 g. of Steamed rice.
- Prepare 2 cloves of Garlic.
- You need 30 g. of Onion.
- You need 1/2 tbsp. of Soy sauce.
- You need 1/2 tbsp. of Curry powder.
- It's 2 tsp. of Sugar.
- Prepare 2 of eggs.
- You need 20 g. of Cashew nut.
The BEST Pineapple Fried Rice Recipe in a Pineapple Bowl •How to Make Pineapple Bowl |ThaiChef Food instructions
- Make Pineapple bowl • cut in half and remove pineapple meat as shown and bake 15 mins at 150 C for more flavour.
- Soak cashew nut in water 10 mins then strain and fried with low heat •whisk egg and seasoning with pinch of salt fried in high heat using strainer for make egg crispy and fluffy • fried chicken meat until cooked • fried garlic with low heat + add onion until get aroma • add chicken meat + steamed rice + curry powder + pineapple juice + pineapple meat + sugar + spring onion + cashew nut • Done !! 😋😋.
Got ingredients for production The BEST Pineapple Fried Rice Recipe in a Pineapple Bowl •How to Make Pineapple Bowl |ThaiChef Food recipes is also not hard. You can easily get the main ingredients at the closest supermarket and indeed on the market. There are ample types of The BEST Pineapple Fried Rice Recipe in a Pineapple Bowl •How to Make Pineapple Bowl |ThaiChef Food that are convenient and quick to process into delicious dishes. You can always praxis this The BEST Pineapple Fried Rice Recipe in a Pineapple Bowl •How to Make Pineapple Bowl |ThaiChef Food recipe at home, and can presenting it to your children and extended family. If you want to cook different foods on our website, we supply various types of food recipes which are of certainly very delicious and enjoyable to enjoy, please try they.
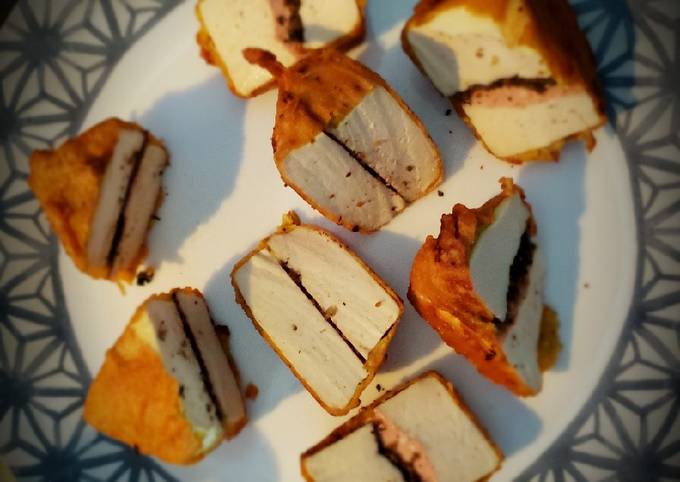
Easiest Way to Cook Perfect Tofu pakoda😋
Tofu pakoda😋. Hi dears.here I show you how to prepare potato pakoda.watch it. I'm excited to share my Korean-style mapo tofu (mapadubu: 마파두부) recipe with you today! Using some Korean ingredients in your pantry you can make this dish.
 Ragi Pakoda is a very special recipe that's made in almost all the households in the kongunad region for evening snack. The pakoda will be very hard and gummy without the peanut powder. This Craft Essence features Mapo Tofu of Fuyuki's Hongzhou Feast Hall: Taishan, the favorite dish of Kotomine Kirei from Fate/Stay Night. Tofu pakoda😋 most diverse and own mind taste that unique. Some types of Tofu pakoda😋 recipes are also enough easy to process and do not take lengthy. Although not everybody likes Tofu pakoda😋 food, nowadays few people are get attached and like the various Tofu pakoda😋 foods available. This can be seen of the number of restaurants that prepare Tofu pakoda😋 as one of the dishes. You can cook Tofu pakoda😋 using 12 ingredients and 8 steps. Here is how you cook it.
Ingredients of Tofu pakoda😋
- Prepare 1 cup of gramflour.
- Prepare 1 tbsp of salt.
- You need 1 tbsp of red chilli powder.
- It's 1 tsp of turmeric.
- Prepare 1 tsp of black pepper.
- Prepare Pinch of hing or asafetida.
- Prepare 1 tsp of garam masala.
- Prepare 1 tsp of coriander powder.
- Prepare 1 tsp of cumin powder.
- Prepare Half of cup curd.
- Prepare 8-10 of tofu slices short square cut.
- It's as needed of oil to fry.
Community content is available under CC-BY-SA unless otherwise noted. Tofu, also known as bean curd, is a food prepared by coagulating soy milk and then pressing the resulting curds into solid white blocks of varying softness; it can be silken, soft, firm, or extra firm. the pakoda looks inviting and super crisp. btw did u use any food processor to cut onions? sorry to be so naive. Bread Pakora Recipe Ramazan Special iftar recipes Unique Bread Pakoda Recipe Aloo Bread. Soft (or silken) tofu is fresh tofu with a smooth, custard-like consistency.
Tofu pakoda😋 instructions
- Let's cut first tofu in slim squares then keep it aside.
- Now make smooth thick mixture of all the ingredients and spices after whisking with hands.mixture should thick so it could coated on tofu slices.
- If you have any homemade chutney let it spread little bit in the center of two pieces and close them to coat in mixture.
- If no chutney available then make a dry spices powder by mixing all the important spices like salt,pepper,chaat masala and garam masala red chilli powder just not turmeric..
- Let coat one piece of tofu square with dry mix and close with another square piece.
- Let's start coating the tofu pieces and fry them at medium flame until looks golden.
- Remember do not flip again and again, just one time after frying one side. Otherwise coating with break off because tofu is so soft.
- Enjoy yummy pakodas with a sprinkling of chaat masala. Stay safe stay healthy stay happy.
It is often eaten cold as Firm tofu is also fresh tofu, but it has a much sturdier texture than soft tofu. As a result, it stands up. Grilled Liempo with Fried Tofu is just like sinuglaw and tokwat baboy. It is a combination of two It is a spicy Sichuan tofu dish. Before you begin, let me first caution you about how spicy this dish can be.
Got ingredients for making Tofu pakoda😋 recipes is also not hard. You can easily get the main ingredients at the closest supermarket and indeed on the market. There are many types of Tofu pakoda😋 that are convenient and fast to process into delicious dishes. You can constantly practice this Tofu pakoda😋 recipe at home, and can provide it to your children and extended family. If you wish to cook other foods on our website, we supply sundry types of food recipes which are of course very delicious and enjoyable to enjoy, please try their.
Recipe: Tasty Stew Chicken
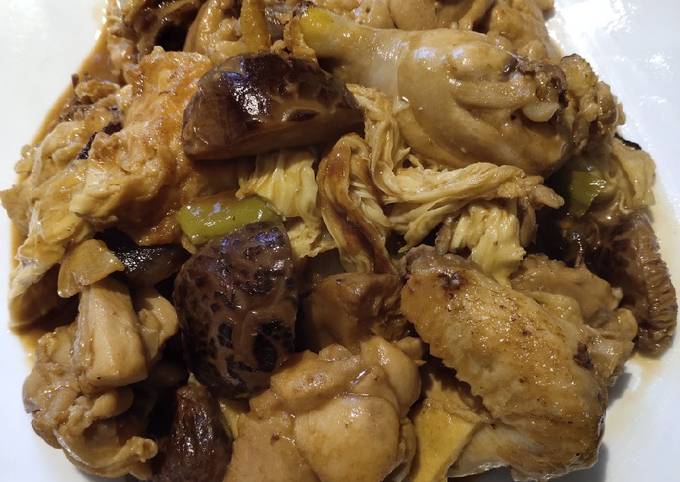
Stew Chicken.
 Stew Chicken very diverse and own ideal taste that unique. Some types of Stew Chicken recipes are also adequate simple to process and dont take long. Even though not everybody likes Stew Chicken food, nowadays several people are got attached and like the sundry Stew Chicken foods on hand. This can be visible than the number of restaurants that provide Stew Chicken as one of the dishes. You can have Stew Chicken using 10 ingredients and 4 steps. Here is how you cook it.
Ingredients of Stew Chicken
- Prepare Half of chicken cut into pieces.
- Prepare 1 of fish maw.
- Prepare 5 pieces of dried.mushroom.
- Prepare stalks of Spring onion.
- You need sheets of Dried bean curd.
- You need slices of Garlic and ginger.
- You need of Soy sauce.
- Prepare of Dark soy sauce.
- You need of Oyster sauce.
- Prepare of Cooking wine.
Stew Chicken step by step
- Add oil.in the wok then charr the dried mushroom. Remove save for later use.Fried the beancurd sheets thenset aside.Sautee ginger garlic and stalks of spring onion until fragrant then add the chicken.Cook.it until color changes to golden brown.
- When golden brown already pour cooking wine mix it then add mushroom..
- Let it simmer until chicken are half cook then add fish maw.Add oyster sauce soy and dark soy sauce then add.beancurd.Mux it and cover let it simmer until the sauce thickens.
- .
Obtain ingredients for making Stew Chicken recipes is also not difficult. You can easily get the main ingredients at the proximate supermarket and indeed on the market. There are much kinds of Stew Chicken that are easy and fast to process into delicious dish. You can constantly practice this Stew Chicken recipe at home, and can provide it to your children and extended family. If you wish to cook other foods on our website, we provide various types of food recipes which are of certainly very delicious and enjoyable to enjoy, please try them.
Recipe: Perfect Easy And Very Fast No Bake Dairy Free Strawberry Shortcake :)
Easy And Very Fast No Bake Dairy Free Strawberry Shortcake :). Today we will be making a super easy to make and super yummy Holiday Trifle that all your family and friends will love! This easy dairy-Free strawberry shortcake is adapted from Bisquick. Let sit and macerate while you bake the shortcake.
 If you love strawberries and shortcake, then this is the recipe. This Easy Strawberry Shortcake Recipe features homemade shortcake biscuits topped with juicy This strawberry shortcake recipe is so easy to prepare. It's a great candidate for kids helping in the Twisting will mess up the layers and they'll bake/rise funky. Easy And Very Fast No Bake Dairy Free Strawberry Shortcake :) highly diverse and own mind sense that unique. Several kinds of Easy And Very Fast No Bake Dairy Free Strawberry Shortcake :) recipes are also enough simple to process and do not pick up long. Though not everybody likes Easy And Very Fast No Bake Dairy Free Strawberry Shortcake :) food, currently some people are getting attached and like the various Easy And Very Fast No Bake Dairy Free Strawberry Shortcake :) foods on hand. This could be seen than the number of restaurants that provide Easy And Very Fast No Bake Dairy Free Strawberry Shortcake :) as one of the dishes. You can cook Easy And Very Fast No Bake Dairy Free Strawberry Shortcake :) using 11 ingredients and 9 steps. Here is how you cook that.
Ingredients of Easy And Very Fast No Bake Dairy Free Strawberry Shortcake :)
- You need 1 of Baked 9" sponge cake (pie shell shape).
- It's of Strawberry Glaze.
- You need 1 of Glaze mix for fresh stawberries.
- Prepare 1 cup of Boiled water (still hot).
- Prepare 2/3 cup of Sugar.
- It's 2 packages of Fresh strawberries.
- You need of Topping.
- It's 1 packages of Nutriwhip.
- You need 1/3 cup of Powdered sugar.
- Prepare 2 tbsp of Strawberry jam.
- Prepare of Cake candy topping.
Dip the cutter in some flour before cutting. No-Bake Strawberry Shortcake Bars taste just like strawberry shortcake! No baking necessary to make these gluten-free, Paleo, and vegan bars. My strawberry shortcake thoughts were immediately confirmed when my boyfriend took a bite and declared that they totally tasted like.
Easy And Very Fast No Bake Dairy Free Strawberry Shortcake :) instructions
- Cut the two packages of strawberries in slices and put them aside in a bowl.
- In a large bowl, mix the glaze mix and the sugar with a whip. Next pour the boiling water into the mix slowly, continuously mixing. Mix until the mix has a smooth, gooey texture..
- Add in the sliced strawberries (keep two slices aside if you want to put some on top like me). Mix with a wooden spoon until the strawberries are fully coated..
- Pour the mix into your sponge cake shell. Even with a spoon and pop in the fridge while you do the topping..
- In a large bowl, pour the package of Nutriwhip. Mix with a mixer until it becomes a little more stiff, then pour in the powdered sugar. Keep mixin until you obtain a nice whipped cream texture (it takes around 4-5 minutes to get there). If you want to make sure you have the right texture, you should be able to lift the mixer and shake it a little without any of the whipped cream dropping..
- Take out the cake in the fridge. Put the whipped cream into a decorating bag (or just use a ziploc and cut a corner) and press some nice little drops all over the cake (as the picture shows)..
- Put the strawberry slices you had left aside (if you did) on top of the cake..
- In a small bowl, put the strawberry jam and a pinch of powdered sugar. Pop in the microwave for 25 seconds. Take out and stir. Pop back in if it dosen't have a "syrup" texture yet. Pour the mixture into a small ziploc bag (cut the corner BUT A TINY CUT) and pour the mix on top of the cake, swirling around..
- Drop some cake decoration candies on top and you have it! :).
The perfect smooth and creamy no bake strawberry cheesecake, made with strawberries, cream So quick and easy, it's the perfect treat! If you're reading this right in the heart of But I have never tasted a dairy-free cream cheese that truly tastes like "real" cream cheese. The BEST Strawberry Shortcake recipe that's vegan, dairy free, and so easy to make! The shortcake requires just SIX simple ingredients and the whole thing requires just a few quick minutes It does give the cake a very faint coconut flavor but I find it very tasty! I can't say that I've made this a.
To get ingredients for production Easy And Very Fast No Bake Dairy Free Strawberry Shortcake :) recipes is also not tough. You can easily get the main ingredients at the proximate supermarket and indeed on the market. There are much kinds of Easy And Very Fast No Bake Dairy Free Strawberry Shortcake :) that are easy and fast to process into delicious serving. You can constantly praxis this Easy And Very Fast No Bake Dairy Free Strawberry Shortcake :) recipe at home, and can provide it to your children and extended family. If you wish to cook other foods on our website, we provide sundry types of food recipes which are of certainly very delicious and enjoyable to enjoy, please try they.
How to Make Yummy Chicken and Pork Soup
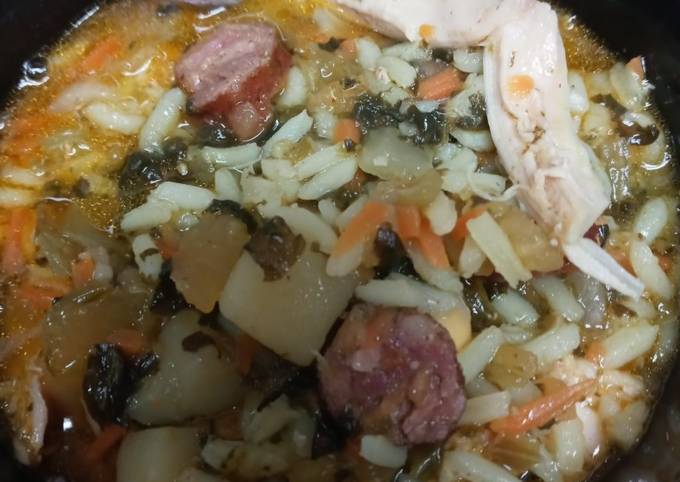
Chicken and Pork Soup. Sunday lunch: beetroot soup, roast pork shoulder, apple and blackberry steamed pudding. Today I want to you enjoy with tasty cooking chicken pork soup. More yummy cooking:Tasty Guava Fruit With Chili.
 This hearty cabbage soup with chicken, pork and lots of vegetables is a simple one pot meal. Great comfort food for a cold winter evening. Keywords: best cabbage soup recipe, cabbage soup ingredients, Cabbage Soup with Chicken and Pork, chicken soup with cabbage, simple cabbage. Chicken and Pork Soup most diverse and own mind taste that unique. Some kinds of Chicken and Pork Soup recipes are also enough simple to process and dont take long. Although not everyone likes Chicken and Pork Soup food, currently several people are get attached and like the various Chicken and Pork Soup foods available. This can be visible than the number of restaurants that supply Chicken and Pork Soup as one of the dish. You can cook Chicken and Pork Soup using 24 ingredients and 8 steps. Here is how you cook it.
Ingredients of Chicken and Pork Soup
- You need of Vegetables and Rice.
- It's 3/4 pound of Rutabagas.
- You need 12 ounces of frozen spinach.
- Prepare 1 cup of pole beans or Italian cut green beans.
- It's 1 cup of shredded carrots.
- You need 1 cup of chopped celery.
- Prepare 1 cup of diced onion.
- It's 8 ounce of lupini beans.
- It's 1 cup of water to be add with broth.
- Prepare 1 cup of yellow rice.
- It's 1-1/2 cup of diced potatoes.
- It's of Meat.
- Prepare 3 pound of chicken thighs skin-on, bone-in.
- You need 2/3 pound of center cut thinly sliced porkchops.
- You need 1 pound of smoked sausage.
- It's 1-3/4 pound of chicken feet for making broth.
- Prepare 2 quarts of chicken broth.
- It's of Spices.
- You need 3 cloves of garlic sliced.
- Prepare 1 teaspoon of salt.
- Prepare 1 teaspoon of ground white pepper.
- You need 1/2 teaspoon of salt (pork).
- Prepare 1/2 teaspoon of ground white pepper (pork).
- It's 1 teaspoon of ground paprika (pork).
Enjoy the chunkiness of chipotle chicken and black beans combined with the smooth sweet soup, plus a kick of chilli. This rustic, chunky soup uses up leftover roast chicken and is packed with flavour from fresh rosemary, sage and thyme. This Pork and Chicken Stock has appeared once already on the blog--in my Shanghai Wonton Soup post. But I'm sharing it today as its own recipe, because I don't just believe that this stock can stand on its own, I also believe it is invaluable!
Chicken and Pork Soup step by step
- Peel and slice the garlic. Slice the Rutabagas drain the lupini beans. Even though they read ready to eat they ain't even close. Start them early or omit them and use Lima beans..
- Slice the spinach start the garlic. Then add the vegetables. Also start the chicken to boil in the broth..
- Stir all the vegetables in well measure the rice. Allow to simmer covered 15 minutes covered before adding rice..
- Add the rice stir in and cover allow to cook as long as it takes to slice the pork and seasoning it..
- Take the pork and stack up and slice into strip and season. Add to the vegetables..
- Stir in the pork and a turn heat low and cover allow to cook 20 minutes stirring occasionally. Check the chicken if done remove chicken from broth and add chicken feet without nails on..
- Let the chicken cool. When cooled remove skin and meat from the bones. Chop the chicken meat and save the skin for another recipe. Add the chicken to the soup vegetables..
- Stir in the chicken when the feet are done remove from broth and add the broth and 1 cup water to the soup. Simmer 20 minutes and serve. I hope you enjoy!!.
The simple reason of course is the flavor. But you can also make this with other leftovers, like chicken. This soup evolved on a whim one day when I had lunch plans with a friend and promised to take over a taco spread using leftover Pork Carnitas (I even. Make this Healthy Instant Pot Chinese Pork Bone Soup (紅蘿蔔粟米豬骨湯). Super easy & quick to make this sweet & delicious soup that tastes like mom's.
Obtain ingredients for production Chicken and Pork Soup recipes is also not tough. You can easily get the main ingredients at the closest supermarket and indeed on the market. There are ample types of Chicken and Pork Soup that are convenient and fast to process into delicious dish. You can constantly praxis this Chicken and Pork Soup recipe at home, and can provide it to your children and extended family. If you want to cook other foods on our website, we supply sundry types of food recipes which are of certainly very delicious and enjoyable to enjoy, please try their.
Recipe: Delicious Pantry roast chicken
Pantry roast chicken.
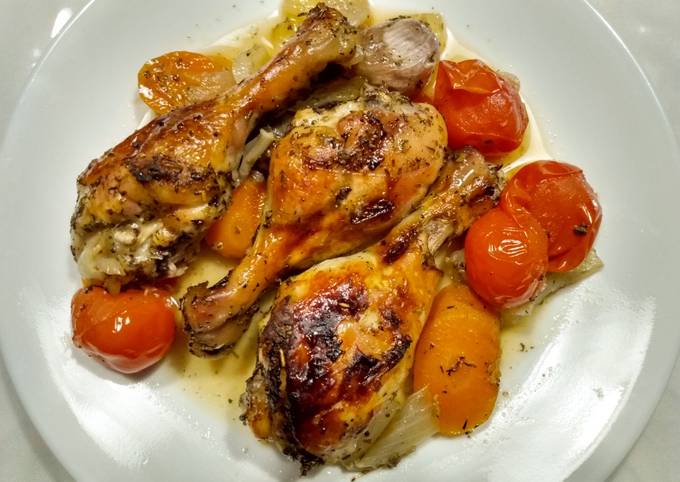 Pantry roast chicken very diverse and own ideal taste that unique. Few types of Pantry roast chicken recipes are also sufficient convenient to process and dont take long. Though not everyone likes Pantry roast chicken food, nowadays some people are get attached and like the various Pantry roast chicken foods available. This could be seen from the number of restaurants that provide Pantry roast chicken as one of the dishes. You can have Pantry roast chicken using 9 ingredients and 3 steps. Here is how you cook it.
Ingredients of Pantry roast chicken
- It's of white balsamic vinegar.
- Prepare of extra virgin olive oil.
- Prepare of honey.
- It's of chicken drumsticks, bone-in and skin-on.
- Prepare of large carrots, unpeeled and cut into 1/4 in diagonal slices.
- You need of whole garlic cloves, unpeeled.
- It's of large onion, sliced thickly.
- Prepare of Italian seasoning.
- It's of small carton grape tomatoes.
Pantry roast chicken instructions
- Preheat your oven to 350 F..
- Ina large mixing bowl, whisk together the balsamic, olive oil and honey until thoroughly combined. Add the remaining ingredients except for the tomatoes, plus a large pinch of salt and several grinds of black pepper. Toss until everything's coated. Pour into a roasting tray and seal tightly with foil. Put in the oven and roast for 1 hour..
- Remove the foil and baste the chicken with whatever juices have come out. Add the tomatoes whole and put the tray back in the oven, uncovered. Turn the heat up to 425 F and roast 20 minutes or until the chicken is nicely browned. Serve with bread to soak up the juices..
Obtain ingredients for manufacture Pantry roast chicken recipes is also not hard. You can easily get the main ingredients at the proximate supermarket and indeed on the market. There are much kinds of Pantry roast chicken that are convenient and fast to process into delicious serving. You can constantly practice this Pantry roast chicken recipe at home, and can serve it to your children and extended family. If you wish to cook different foods on our website, we prepare sundry types of food recipes which are of course very delicious and enjoyable to enjoy, please try their.
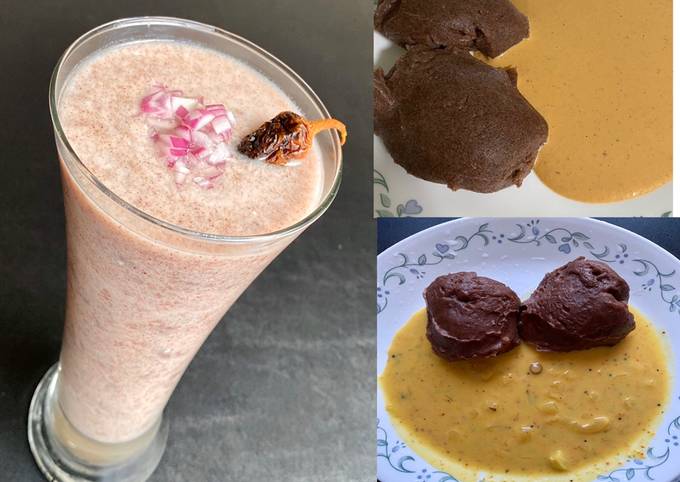
Recipe: Tasty Ragi (Finger millet) Kali/ Koozh (Porridge)
Ragi (Finger millet) Kali/ Koozh (Porridge). Eleusine coracana, or finger millet, is an annual herbaceous plant widely grown as a cereal crop in the arid and semiarid areas in Africa and Asia. Ragi also know as finger millet is a rich source of calcium, protein, fiber, iron and other minerals. Wet your fingers and touch the ragi + rice mix, if it sticks, you have to cook for some more time.
 Ragi is a whole grain that is gluten free and a staple food in South India. Finger Millet (Ragi) Koozh - A popular drink made in the villages using Ragi. Ragi Powder to make porridge for babies. Ragi (Finger millet) Kali/ Koozh (Porridge) most diverse and own ideal flavor that unique. Several kinds of Ragi (Finger millet) Kali/ Koozh (Porridge) recipes are also adequate convenient to process and dont pick up lengthy. Though not everybody likes Ragi (Finger millet) Kali/ Koozh (Porridge) food, now some people are got attached and like the various Ragi (Finger millet) Kali/ Koozh (Porridge) foods available. This could be visible than the number of restaurants that supply Ragi (Finger millet) Kali/ Koozh (Porridge) as one of the dishes. You can cook Ragi (Finger millet) Kali/ Koozh (Porridge) using 7 ingredients and 9 steps. Here is how you cook that.
Ingredients of Ragi (Finger millet) Kali/ Koozh (Porridge)
- You need of To make Kali.
- Prepare 2 1/2 cup of ragi flour.
- You need 5 cup of water (approx).
- It's of Plus 1/2 cup water if required.
- You need of To make koozh(porridge).
- You need of Butter milk as required (or curd with water).
- Prepare of Salt as required.
Ragi Porridge - a miracle food for people of all ages. My childhood thrived on it, at least as an infant and in the recent years my kids have been fed. Ragi porridge is also a quick breakfast option for people of all ages and considering that it is rich in calcium, iron, soluble fibre & vitamin D, it is one of. Roti, porridge, dosa, mudde, payasam - ragi flour can be used in many different ways.
Ragi (Finger millet) Kali/ Koozh (Porridge) instructions
- Add ragi flour and 5 cups water to a mixing bowl. Mix it without any lumps. We can add more water later if required.
- Heat a vessel and add this mixture to it. Keep stirring using a ladle on medium flame..
- Slowly the mixture will start thickening and tends to make lumps. Immediately Keep the flame in low heat and use backside of a wooden ladle/mathu (or thidupu) to stir. Stir it vigorously such that you break the lumps..
- In 5 mins, it becomes more thicker. At this stage leave it in low flame for 5 mins..
- After 5 mins, stir it once and Leave it again for another 5 mins. Keep stirring once every 5 mins until it gets cooked..
- At one stage, the kali gets firmer and starts leaving the pan. That’s how we know that it cooked completely. Switch off the flame..
- Place this vessel in floor and hold it with feet by keeping a cloth in between. Stir it once vigorously using the backside of wooden ladle..
- Serve with any gravy or peanut chutney..
- To make koozh: add ragi ball, buttermilk and salt to a mixing bowl. Mix it well by using hand..
The grain is so tiny, it really cannot Finger millet is especially valuable as it contains the amino acid methionine, which is lacking in the diets of hundreds of millions of the poor who live on starchy. Traditionally Ragi is the first millet recommended to be introduced to babies. This ragi milk porridge helps developing babies digestive system before the baby starts with proper solids like idli,rice etc. I usually feed this koozh with. Ragi (Finger Millet) (Eleusine coracana) is one of the. important cereals occupies highest area under cultivation. among the small millets and it is a good Porridge (koozh) is one of the traditional foods made from Eleusine coracana L. grains (Finger millet).
Obtain ingredients for production Ragi (Finger millet) Kali/ Koozh (Porridge) recipes is also not tough. You can easily get the main ingredients at the closest supermarket and even on the market. There are much types of Ragi (Finger millet) Kali/ Koozh (Porridge) that are easy and fast to process into delicious serving. You can constantly praxis this Ragi (Finger millet) Kali/ Koozh (Porridge) recipe at home, and can presenting it to your children and extended family. If you wish to cook other foods on our website, we supply sundry types of food recipes which are of course very delicious and enjoyable to enjoy, please try they.
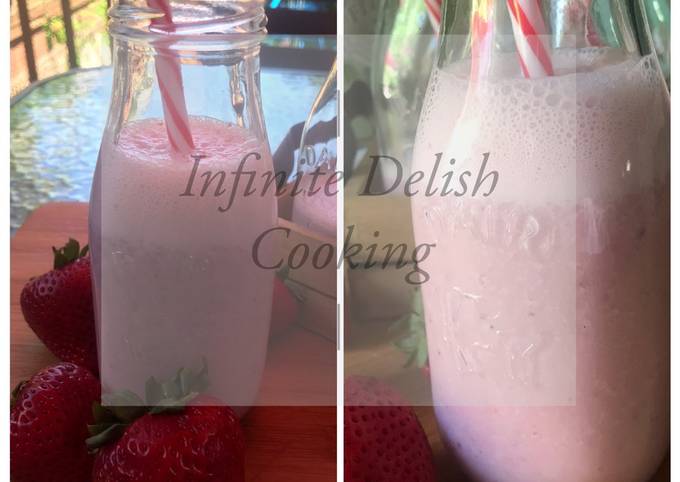
Easiest Way to Prepare Appetizing Strawberry banana milkshake
Strawberry banana milkshake. Strawberry Banana Milkshake prepared with this recipe is an ultimate summer cooler. Creamy shake of calcium and energy rich banana, milk and vitamin C rich strawberry is a celestial fresh fruit. Milkshakes are seriously one of my family's favorite treats!
 I make strawberry, banana milkshakes at the restaurant I work in. They just happen to be Justin Biebers' favorite. I have not made him one personally but I do work in his favorite hometown restaurant. Strawberry banana milkshake most diverse and have mind taste that unique. Some kinds of Strawberry banana milkshake recipes are also enough convenient to process and dont pick up long. Although not everyone likes Strawberry banana milkshake food, now several people are got attached and like the sundry Strawberry banana milkshake foods available. This could be visible than the number of restaurants that prepare Strawberry banana milkshake as one of the dishes. You can have Strawberry banana milkshake using 5 ingredients and 3 steps. Here is how you achieve it.
Ingredients of Strawberry banana milkshake
- It's of strawberries.
- Prepare of medium banana.
- You need of cold milk.
- It's of strawberry ice cream.
- Prepare of Honey.
This frozen banana whip is the base for my strawberry banana milkshakes. I make these fruity milkshakes all the time. They're one of my favorite afternoon snacks, especially when all I want is. Chocolate Strawberry Banana Milkshake. this link is to an external site that may or may not meet accessibility.
Strawberry banana milkshake step by step
- Into a blender mix all the ingredients together.
- The milkshake is ready to enjoy it.
- Please subscribe to my YouTube channel. https://www.youtube.com/channel/UCBELgAidcSHhx5JH4VtQ2og.
Strawberry banana milkshake recipe is thick and creamy even without ice cream. In this recipe, you can modify it by adding more strawberries and bananas as per taste. To make strawberry banana milkshake, put the strawberries , bananas, milk, sugar and ice cubes in a blender and blend till smooth. Pop in straws. …a classic strawberry banana smoothie. ♡. It was the very first smoothie recipe that I ever learned to make back in high school when smoothies were the hip new thing and everyone was blending up a.
To get ingredients for production Strawberry banana milkshake recipes is also not difficult. You can easily get the main ingredients at the nearest supermarket and even on the market. There are many types of Strawberry banana milkshake that are simple and fast to process into delicious serving. You can constantly practice this Strawberry banana milkshake recipe at home, and can provide it to your children and extended family. If you want to cook another foods on our website, we provide various types of food recipes which are of certainly very delicious and enjoyable to enjoy, please try their.
Easiest Way to Make Tasty Triple pulse burger!
Triple pulse burger!. Burger King Triple Whopper Cheeseburger or a Wendy's Triple Dave's cheeseburger? Today I'm gonna find out which American fast food chain restaurant I like more. I went to the Burger King Drive.
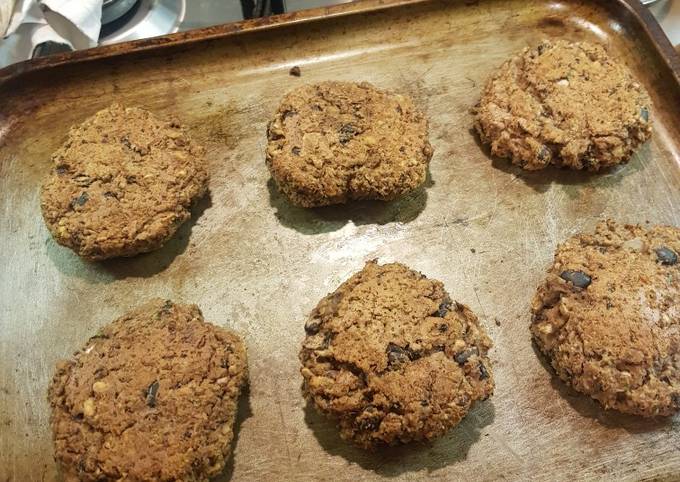 It is a double Krabby Patty with two extra slices of lettuce, cheese, and tomatoes. However, it still only has one patty. See more ideas about Cooking recipes, Recipes, Burger recipes. Triple pulse burger! very diverse and own ideal sense that unique. Few kinds of Triple pulse burger! recipes are also sufficient convenient to process and dont take lengthy. Even though not everyone likes Triple pulse burger! food, now few people are getting attached and like the sundry Triple pulse burger! foods available. This could be seen from the number of restaurants that prepare Triple pulse burger! as one of the dish. You can cook Triple pulse burger! using 14 ingredients and 8 steps. Here is how you achieve that.
Ingredients of Triple pulse burger!
- It's of soaked and boiled dried black beans (or just us a tin).
- You need of soaked and boiled dried brown lentils (or just use a tin).
- You need of broad beans, drained.
- Prepare of onion, roughly diced.
- You need of oil.
- It's of garlic crushed.
- Prepare of chili powder.
- It's of cumin powder.
- It's of sriracha chili sauce.
- It's of Walnuts.
- It's of fresh coriander.
- It's of Plain flour.
- It's of chickpea flour.
- It's of salt.
The BEST burger sauce recipe you'll ever try! If you finish the entire Quadruple Bypass Burger, you get a. When even a double won't fill you up. Three delicious, signature flame-grilled beef patties topped three slices of melted cheese, crinkle cut pickles, yellow mustard, and ketchup on.
Triple pulse burger! step by step
- Preheat the oven to 190 C and prepare all the ingredients..
- Put the drained butter beans and Walnuts in a food processor and blitz till almost smooth.
- In the meantime add one tablespoon of the oil to a frying pan and add the chopped onion and garlic. Sautee until translucent but not brown..
- Add the remaining tablespoon of oil to the walnut and broad bean mixture in the food processor followed by the black beans and lentils, including a little of the water they were cooked in to help the mixture combine. Blitz in the food processor for 1 minute or until roughly combined. You should still see some black beans whole..
- Remove a quarter of the mixture and place in a big bowl. This will help keep some of the beans intact for texture!.
- Blitz the remaining mixture in the food processor till smooth but not mashed. Add this to the bowl with the chopped coriander and flour one tablespoon at a time..
- Add salt as needed and stir the mixture to combine. When it's thick enough to handle but still a bit sticky, grab palm sized balls of the mixture and form into a round flat burger patty. Place the patty on a baking tray..
- Repeat till the mixture is done. This should make about 10 patties but depends how much beans and flour you use. Place the baking tray in the oven for 15 minutes, flipping the burgers after 10 minutes so they brown evenly..
You are now leaving the Burger King South Africa website and will be redirected to the Burger King Corporation website. Menu > Burgers > Bondi Burger®. The Triple Double will feature two of Smashburger's famous fresh never frozen beef patties, two It's Smashburger's beefiest, cheesiest burger to date and will quickly become a favorite for burger lovers. The Triple Stacker Burger features three Zinger fillets, bacon, cheese, chilli relish and supercharged sauce on a sesame seed bun. The burger has triple the cheese and double the beef, topped with garlic-grilled onions and Gulden's mustard — all on a pretzel bun.
To get ingredients for making Triple pulse burger! recipes is also not hard. You can easily get the main ingredients at the nearest supermarket and in fact on the market. There are ample kinds of Triple pulse burger! that are convenient and quick to process into delicious dish. You can constantly praxis this Triple pulse burger! recipe at home, and can serve it to your children and extended family. If you wish to cook different foods on our website, we prepare sundry types of food recipes which are of certainly very delicious and enjoyable to enjoy, please try their.
How to Prepare Delicious Lemon Chicken
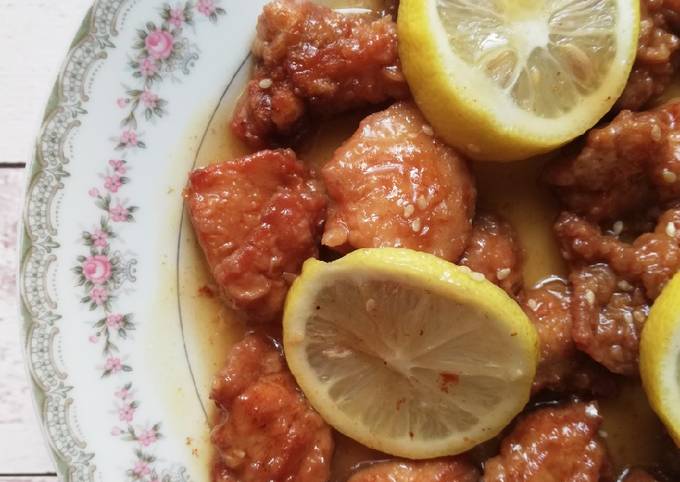
Lemon Chicken.
 Lemon Chicken very diverse and own mind flavor that unique. Some kinds of Lemon Chicken recipes are also enough easy to process and dont take long. Even though not everyone likes Lemon Chicken food, now few people are getting attached and like the various Lemon Chicken foods available. This could be visible from the number of restaurants that provide Lemon Chicken as one of the dish. You can have Lemon Chicken using 14 ingredients and 4 steps. Here is how you achieve it.
Ingredients of Lemon Chicken
- Prepare 500 g of chicken thigh fillet.
- Prepare 1 Tbsp of oyster sauce.
- It's 1 of egg.
- It's 2 Tbsp of All-Purpose flour.
- You need 2 Tbsp of cornstarch.
- You need 1 cup of cooking oil.
- It's 1 cup of water.
- Prepare 1/4 cup of honey.
- You need 1/4 cup of lemon juice.
- You need 1 tsp of sesame oil.
- You need 2 Tbsp of cornstarch.
- You need 1 tsp of sesame seeds.
- Prepare 1 Tbsp of spring onions (optional).
- You need slices of Lemon.
Lemon Chicken instructions
- Season chicken with oyster sauce. Mix in egg, flour, and cornstarch..
- Fry in preheated oil until golden brown. Strain and set aside..
- In a pan, simmer water. Pour lemon juice, honey, sesame oil, and cornstarch mixture. Simmer until thick..
- Toss in cooked chicken and cook for another minute. Transfer on a serving plate, top with sesame seeds, spring onions and lemon slices (if desired). Serve immediately..
Got ingredients for making Lemon Chicken recipes is also not difficult. You can easily get the main ingredients at the closest supermarket and in fact on the market. There are ample types of Lemon Chicken that are simple and fast to process into delicious dishes. You can constantly practice this Lemon Chicken recipe at home, and can presenting it to your children and extended family. If you wish to cook different foods on our website, we provide various types of food recipes which are of course very delicious and enjoyable to enjoy, please try they.
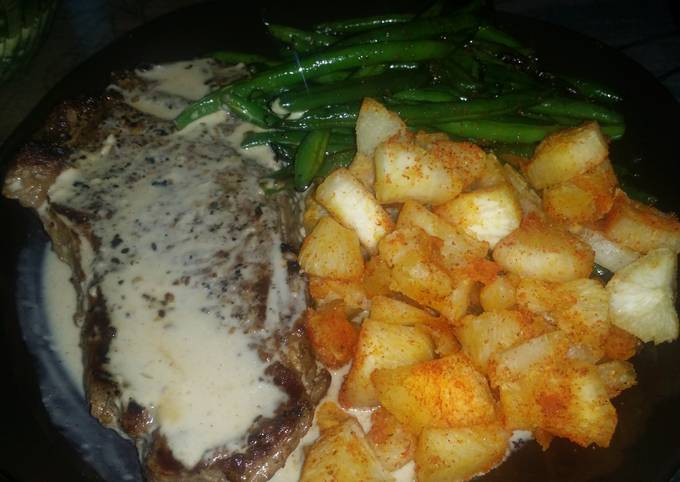
Easiest Way to Prepare Perfect New York Steak with roasted garlic cream sauce, yucca root and stir fried green beans
New York Steak with roasted garlic cream sauce, yucca root and stir fried green beans. HelloFresh - New York Strip Steak w/ Truffled Mashed Potatoes & Green Beans Amandine. NY strip is my favorite cut of steak and I prefer it with the bone in because I always feel like it ads more flavor to the steak. I melted a tablespoon of butter and some onions + garlic right on top of the steak while it was cooking.
 Spread the paste evenly on both sides of the steaks. Simply roast fresh green beans with olive oil, salt, and black pepper until browned to bring out their They crisp up pretty much like oven fries and they're surprisingly delicious. It's making my low carb When I do the beans I add a smidge of garlic, and sprinkle with fresh grated parmesan before serving. New York Steak with roasted garlic cream sauce, yucca root and stir fried green beans most diverse and own ideal sense that unique. Several types of New York Steak with roasted garlic cream sauce, yucca root and stir fried green beans recipes are also sufficient simple to process and do not take lengthy. Even though not everybody likes New York Steak with roasted garlic cream sauce, yucca root and stir fried green beans food, nowadays several people are got attached and like the various New York Steak with roasted garlic cream sauce, yucca root and stir fried green beans foods on hand. This could be visible from the number of restaurants that supply New York Steak with roasted garlic cream sauce, yucca root and stir fried green beans as one of the dishes. You can have New York Steak with roasted garlic cream sauce, yucca root and stir fried green beans using 18 ingredients and 7 steps. Here is how you achieve that.
Ingredients of New York Steak with roasted garlic cream sauce, yucca root and stir fried green beans
- Prepare of steak.
- You need of fresh crushed black pepper corns.
- You need of kosher salt.
- You need of canola oil.
- It's of New York Steak.
- You need of side dish roasted yucca root.
- Prepare 1 large of Yucca Root.
- You need of Season Salt.
- You need of granulated garlic.
- It's of onion powder.
- You need of canola oil.
- You need of side green beans.
- It's 1/2 lb of fresh green beans.
- Prepare of salt.
- You need of fresh Crack pepper.
- You need 1 of canola oil.
- It's of roasted garlic cream sauce.
- Prepare 1 of my recipe for roasted garlic cream sauce.
You may substitute good quality garlic cream cheese, just add your favourite herbs and let sit over night for flavours to blend. mmmummmm You Add half and half cream. Stir in Boursin cheese or garlic cream cheese until thick and hot. Pour sauce over hot steaks, garnish. Place steaks in skillet and using metal tongs press down across top surface of steaks to ensure the entire bottom surface is making direct contact with Start with a good quality steak.
New York Steak with roasted garlic cream sauce, yucca root and stir fried green beans step by step
- Crush the peppercorns with a rolling pin or frying pan rub steak with oil and then press the steak into the pepper corns both sides then salt it. Let it sit in the fridge as you work in everything else https://cookpad.com/us/recipes/347984-roasted-garlic-cream-sauce.
- Turn oven on to about 400°F degrees .now peel the yucca root I find using a nice to peel it is a lot easier then dice or slice it into rounds what ever is easier just make sure they are even.
- Now boil the yucca root in water salt water like you would do if you were making mash potatoes. Boil till just about fork tender then drain.
- Let cool for a bit for you to handle place into a bowl and toss oil and the seasonings and place on a baking sheet and cook till golden brown it took 25 min for me.
- Now you can blanch your green beans in hot water for about a min or so then in a nice wok stir fry them up and salt and pepper them.
- About half way with everything cook your steak on the grill to the way you like to eat it then finish it off with the cream sauce https://cookpad.com/us/recipes/347984-roasted-garlic-cream-sauce.
- Now just plate up everything and enjoy.
Prime or choice cuts, and this recipe works well with Ribeye or New York Strip (and go with boneless NYT says they. Divide the oyster sauce mixture between the skillets. Jarred black bean sauce serves as a light base for the sauce while minced ginger and garlic impart a heady punch. Though these delicate green beans are traditionally saved for fancy French preparations, they're also perfect for a quick stir-fry. Steak Beans and Legumes Green Bean Main Dish Gluten Free.
Obtain ingredients for production New York Steak with roasted garlic cream sauce, yucca root and stir fried green beans recipes is also not difficult. You can easily get the main ingredients at the closest supermarket and in fact on the market. There are ample kinds of New York Steak with roasted garlic cream sauce, yucca root and stir fried green beans that are convenient and fast to process into delicious serving. You can always practice this New York Steak with roasted garlic cream sauce, yucca root and stir fried green beans recipe at home, and can provide it to your children and extended family. If you wish to cook other foods on our website, we provide various types of food recipes which are of certainly very delicious and enjoyable to enjoy, please try their.
Recipe: Perfect Coconut Milk Chicken with Sweet Potatoes
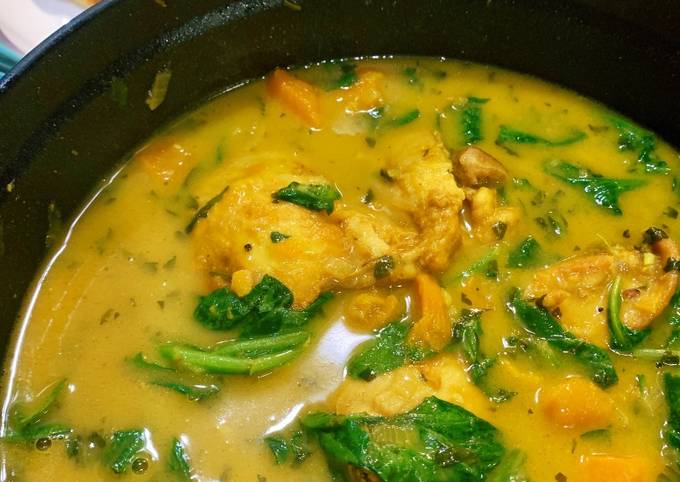
Coconut Milk Chicken with Sweet Potatoes. Stir in coconut milk and sweet potatoes. Arrange chicken pieces on top of potatoes, placing breast meat on top. Pour in enough water to come halfway up the Transfer chicken and sweet potatoes to a platter.
 Simmer the soup for about half an hour, until the chicken and sweet potatoes are close to tender. Stir in the fish sauce, lime juice, and coconut milk. This chicken curry with coconut milk and potatoes is a major favorite every time I make it. Coconut Milk Chicken with Sweet Potatoes most diverse and have mind taste that unique. Several kinds of Coconut Milk Chicken with Sweet Potatoes recipes are also enough easy to process and dont take lengthy. Although not everyone likes Coconut Milk Chicken with Sweet Potatoes food, now several people are got attached and like the various Coconut Milk Chicken with Sweet Potatoes foods available. This could be seen than the number of restaurants that prepare Coconut Milk Chicken with Sweet Potatoes as one of the dish. You can cook Coconut Milk Chicken with Sweet Potatoes using 18 ingredients and 7 steps. Here is how you cook it.
Ingredients of Coconut Milk Chicken with Sweet Potatoes
- You need 1 1/2 lbs of boneless skinless chicken thighs or breasts.
- It's 1 tsp of ground turmeric.
- Prepare 2 tsp of ground ginger.
- It's 3 tbs of sesame oil.
- Prepare 2 of medium shallots, chopped.
- Prepare 2 cloves of garlic, minced or grated.
- Prepare 1 inch of fresh ginger, peeled and grated.
- It's 1 tsp of cayenne pepper.
- Prepare 1/2 cup of fresh cilantro, chopped plus more for serving.
- It's 1 of medium sweet potato, peeled and cut into 1 inch chunks (thicker is better).
- It's 2 cups of low sodium chicken broth.
- Prepare 2 cups of canned coconut milk.
- You need 2 tbs of fish sauce.
- It's 2 cups of fresh baby spinach.
- You need of juice of 2 limes.
- Prepare To taste of kosher salt.
- It's 2 cups of cooked rice, for serving.
- Prepare of naan, for serving - we warm the pre-packaged ones in the oven (optional).
Coconut Milk is good for your heart, and boosts your immune system. Add the chicken, sweet potatoes and lentils and stir to coat in the paste, then pour in the stock and coconut milk. This very easy, mild slow cooker chicken curry is made with chicken breast, potatoes, coconut milk, and red bell pepper with minimal prep. Slow Cooker Chicken Curry is made with coconut milk, chicken breasts, an easy curry powder seasoning blend and sweet potatoes.
Coconut Milk Chicken with Sweet Potatoes step by step
- Toss the chicken with the turmeric, ginger, and 1 tablespoon oil. Let sit 5 minutes..
- Heat 2 tablespoons oil in a large Dutch oven or pot over medium-high heat..
- Add the chicken and sear on both sides until browned, about 2 minutes..
- Add the shallots, garlic, ginger, cayenne, and cilantro, cook 3 minutes, then toss in the sweet potato..
- Season to taste with salt..
- Reduce the heat to low. Add 1 cup broth, the coconut milk, and fish sauce. Partially cover and simmer for 20-30 minutes, or until the chicken is cooked through. If the sauce is too thick, add additional broth. Stir in the spinach and lime juice..
- Serve the chicken and sauce over rice. Top with fresh cilantro. Enjoy with naan..
This Crock-Pot Indian curry is healthy, dairy-free, and gluten-free. It makes a quick and easy weeknight dinner when served with rice. This easy Chicken Curry dish with potatoes, garam masala, cumin and curry spices and simmered with coconut milk. Add tomatoes, cilantro, coconut milk and water. Stir all ingredients and cover pan, simmer on I made this using full fat coconut milk, and sweet potato instead of white potato.
To get ingredients for production Coconut Milk Chicken with Sweet Potatoes recipes is also not tough. You can easily get the main ingredients at the nearest supermarket and in fact on the market. There are many types of Coconut Milk Chicken with Sweet Potatoes that are easy and quick to process into delicious dishes. You can constantly praxis this Coconut Milk Chicken with Sweet Potatoes recipe at home, and can serve it to your children and extended family. If you want to cook another foods on our website, we prepare various types of food recipes which are of certainly very delicious and enjoyable to enjoy, please try them.
Recipe: Appetizing Bone-in Prime rib with red chard, and mini golden potatoes
Bone-in Prime rib with red chard, and mini golden potatoes.
 Bone-in Prime rib with red chard, and mini golden potatoes highly diverse and have mind taste that unique. Few types of Bone-in Prime rib with red chard, and mini golden potatoes recipes are also adequate simple to process and dont pick up long. Even though not everybody likes Bone-in Prime rib with red chard, and mini golden potatoes food, currently few people are get attached and like the sundry Bone-in Prime rib with red chard, and mini golden potatoes foods on hand. This can be seen than the number of restaurants that supply Bone-in Prime rib with red chard, and mini golden potatoes as one of the dish. You can have Bone-in Prime rib with red chard, and mini golden potatoes using 17 ingredients and 13 steps. Here is how you achieve that.
Ingredients of Bone-in Prime rib with red chard, and mini golden potatoes
- Prepare 4 lb of Bone in Ribeye.
- You need 2 lb of golden mini potatoes, fingerlings are just as creamy.
- It's 1 bunch of red shard, rainbow or swiss will work as well.
- Prepare 6 cloves of garlic.
- You need 8 oz of mushrooms. i prefer creminis.
- It's 1/4 cup of plus 4 tbs of butter softened.
- You need of Extra virgin olive oil.
- It's of kosher salt.
- You need of fresh cracked black pepper.
- You need of heres what your going to need pan wise.
- It's 2 of large saute pans.
- It's 1 of deep roasting pan with wire rack.
- Prepare 1 of medium sized pot.
- Prepare of large mixing bowl.
- It's of food processor.
- Prepare 1 bunch of Rosemary.
- It's 1 bunch of Thyme.
Bone-in Prime rib with red chard, and mini golden potatoes step by step
- First off, wash your roast and pat dry. Let sit out for 2 hours before doing anything to it. In the meantime, lets get the compound butter ready..
- Place rosemary and thyme leaves. Add 3 cloves of garlic and about 1 tsp of cracked pepper. Pulse your processor until herbes have become fine and garlic coarse. Add 1/4 cup of softened butter (1 stick) cover and let it sit out until the 2 hours is up for resting the meat. Now its time to get messy. *please refrain from using margarine, i have found an unpleasant flavor from using it..
- Smear butter compound over whole roast. Its gonna look damn sexy!! Now you should preheat the oven to 500°. Once the oven chime goes off, let the oven remain closed for 15 minutes longer.
- Place roast in overn at 500 and set timer for 20 minutes. Leave it alone. Dont open the door..
- Once timer goes off, turn your stove down to 325° and set your timer for 1 hour and 15 minutes.
- Remove chard leaves from thick stems and chop roughly. Place in mixing bowl and cover in water. Mix the leaves removing the dirt from the leaves. You may want to change the water one time to really get all the dirt out..
- Boil potatoes for 15 to 20 minutes or until a fork pierces potatoes easily and drain. Toss with 1 tbsp of butter while still hot, salt and pepper..
- Dont open the oven door ever. That means you!!! Its tempting, but wipe the drool from your chin..
- When the timer goes off on your roast, remove from oven andd place on pot holders, cover entire steak with aluminum foil, and let rest for 15 minutes. Time it again..
- Heat oil in saute pan and add mushrooms, garlic, and 1 tbsp of butter, place chard in pan and cover. Cook until wilted down..
- Almost time to eat!!!!.
- Slice bones off prime rib, save for stock if you want. Slice prime rib into as many servings as you want..
- Enjoy.
Got ingredients for production Bone-in Prime rib with red chard, and mini golden potatoes recipes is also not tough. You can easily get the main ingredients at the nearest supermarket and indeed on the market. There are many kinds of Bone-in Prime rib with red chard, and mini golden potatoes that are simple and fast to process into delicious dish. You can always praxis this Bone-in Prime rib with red chard, and mini golden potatoes recipe at home, and can serve it to your children and extended family. If you want to cook another foods on our website, we provide sundry types of food recipes which are of certainly very delicious and enjoyable to enjoy, please try their.
Recipe: Delicious Homemade Pizza
Homemade Pizza. Next time I'll be a bit more. Tikka pizza with homemade pizza sauce - green pasta salad - orange soda Chicken fajita pizza-Premium quality chicken fajita pizza by the Kitchen Bistro-homemade pizza video. Making homemade pizza dough can sound like a lot of work, but it's so worth the bragging rights.
 Our honeymoon to Italy changed the way we thought about pizza. Learn how to make homemade pizza with this easy recipe! Prep your homemade pizza dough, make your sauce, and then finish it all with your favorite toppings. Homemade Pizza most diverse and own mind flavor that unique. Few types of Homemade Pizza recipes are also enough easy to process and do not take long. Though not everyone likes Homemade Pizza food, currently few people are got attached and like the sundry Homemade Pizza foods on hand. This could be visible than the number of restaurants that prepare Homemade Pizza as one of the serving. You can cook Homemade Pizza using 20 ingredients and 14 steps. Here is how you cook it.
Ingredients of Homemade Pizza
- It's of Dough.
- It's 3 1/2 cup of Bread flour.
- Prepare 3 tbsp of Italian seasoning.
- You need 1 tsp of sugar.
- It's 2 tsp of salt.
- Prepare 1 packages of quick rose pizza dough yeast.
- Prepare 1 cup of warm water (110° F).
- It's 2 tbsp of olive oil.
- It's 1 tbsp of corn meal.
- Prepare of Toppings.
- You need 1/2 cup of pizza sauce.
- You need 2 cup of mozzarella cheese.
- Prepare 15 slice of Turkey pepperoni.
- It's 1/3 cup of Italian sausage pieces, cooked.
- It's 1/4 cup of chopped onion.
- It's 1/4 cup of chopped green bell pepper.
- You need of Buttered crust.
- You need 2 tbsp of melted butter.
- Prepare 1 tsp of Italian seasoning.
- You need 1/4 tsp of garlic powder.
I've been making homemade pizza for many years now and as many of you know it's pretty hard to get a great homemade pizza with similar results as the ones baked in a wood fire oven. These Homemade Pizza Recipes Are Winners. There's no need to say much about pizza because the word itself definitely says it all! It's one of the best-tasting treats and probably the most convenient.
Homemade Pizza step by step
- combine flour, sugar, salt, yeast and Italian seasoning in the bowl of a stand mixer and incorporate.
- add water and oil to dry mixture while dough hook is turning on low speed.
- mix until smooth dough ball forms (if too dry add tablespoon of water until correct consistency, if too wet add tablespoon of flour until desired consistency).
- knead dough on a clean, dry surface for 2-3 minutes.
- coat bottom of large bowl with olive oil and add dough, turning to coat with oil, then cover bowl with plastic wrap.
- place dough in warm spot to double in size.
- after dough has doubled in size, remove from bowl and divide into two equal pieces.
- other half of dough ball can be frozen for future use.
- place pizza stone on oven track and preheat oven to 450° F for at least 30 minutes.
- use rolling pin to work dough into large, thin circle (about 1/4 inch thick).
- sprinkle corn meal on wooden pizza peel.
- transfer dough to pizza peel and add toppings.
- combine melted butter, seasoning and garlic powder in a small dish coat edges of crust using a pastry brush.
- sprinkle more corn meal onto pizza stone and slide pizza from peel onto pizza stone and bake for 15 minutes.
Perfect for a pizza night in! #pizzanight #homemadepizza. Making homemade pizza from prepared dough is a quick and easy dinner any night of the week. Even making your own dough only really adds a few minutes to the prep time! Here are recipes for crispy, cheesy homemade pizzas, from classic Margherita to pies with the Best Homemade Pizza Recipes. Here, F&W's guide to making exceptional pizzas at home, from classic.
To get ingredients for making Homemade Pizza recipes is also not tough. You can easily get the main ingredients at the nearest supermarket and even on the market. There are ample types of Homemade Pizza that are convenient and quick to process into delicious dishes. You can always praxis this Homemade Pizza recipe at home, and can provide it to your children and extended family. If you wish to cook other foods on our website, we supply sundry types of food recipes which are of course very delicious and enjoyable to enjoy, please try they.
Recipe: Appetizing Chicken spinach mushroom and herb layer bake
Chicken spinach mushroom and herb layer bake.
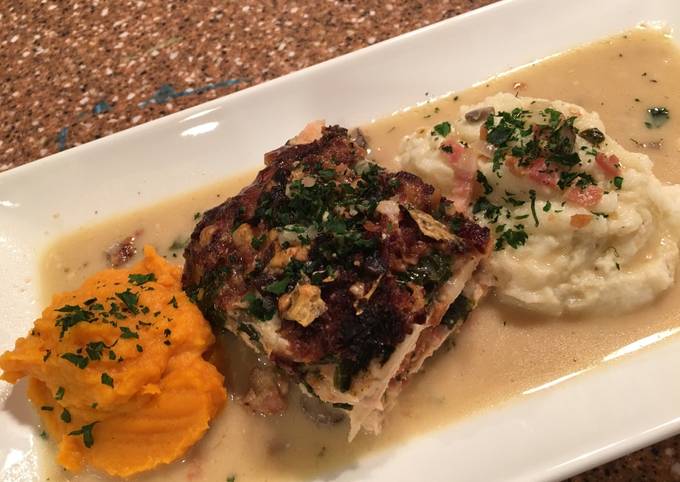 Chicken spinach mushroom and herb layer bake very diverse and have mind taste that unique. Some kinds of Chicken spinach mushroom and herb layer bake recipes are also enough convenient to process and dont take lengthy. Although not everyone likes Chicken spinach mushroom and herb layer bake food, now several people are get attached and like the sundry Chicken spinach mushroom and herb layer bake foods available. This can be visible than the number of restaurants that supply Chicken spinach mushroom and herb layer bake as one of the dishes. You can have Chicken spinach mushroom and herb layer bake using 9 ingredients and 16 steps. Here is how you achieve it.
Ingredients of Chicken spinach mushroom and herb layer bake
- Prepare 9-10 of thinly sliced chicken breast boneless skinless.
- Prepare 1 container of low fat Alouette Herb & garlic spread.
- You need 1 cup of chicken stock.
- You need 1 bag of baby spinach.
- You need 1/2 of yellow onion.
- Prepare 4 ounces of chopped mushroom.
- You need 1 of serving of baked ritz crackers.
- You need 15 g of Parmesan shavings.
- Prepare 6 slices of bacon cooked and chopped in crumbles.
Chicken spinach mushroom and herb layer bake instructions
- Start by placing chopped onion and mushrooms in a skillet.
- When they begin to soften add in a whole container of herb & garlic cheese spread.
- Add in 1 cup of chicken broth stir ingredients well.
- Place a whole bag of baby spinach in and let it wilt into sauce.
- Add a little Herb of Provence and pepper.
- Start with a sprayed casserole dish layer thinly sliced chicken brest.
- Top with sauce and veggie mixture.
- Add a layer of bacon pieces save enough for other layers.
- Repeat layers till you get to top. I got 3 layers.
- Crush up a serving of baked ritz crackers.
- Place crushed crackers on top.
- Measure 3 serving of cheese this was 5g a serving bing I used 3.
- Top with cheese spread out evenly. Place in a 375 degree oven for 45-60 minutes.
- The top got really crunchy it was still 😊.
- MFP information.
- I served mine with a side of prepackaged frozen cauliflower it could also go with rice, pasta something that will soak up the sauce.
Obtain ingredients for making Chicken spinach mushroom and herb layer bake recipes is also not hard. You can easily get the main ingredients at the proximate supermarket and in fact on the market. There are ample types of Chicken spinach mushroom and herb layer bake that are simple and fast to process into delicious dish. You can always praxis this Chicken spinach mushroom and herb layer bake recipe at home, and can provide it to your children and extended family. If you wish to cook other foods on our website, we provide sundry types of food recipes which are of course very delicious and enjoyable to enjoy, please try them.
How to Cook Delicious Greek Pasta Salad (Version 2)
Greek Pasta Salad (Version 2).
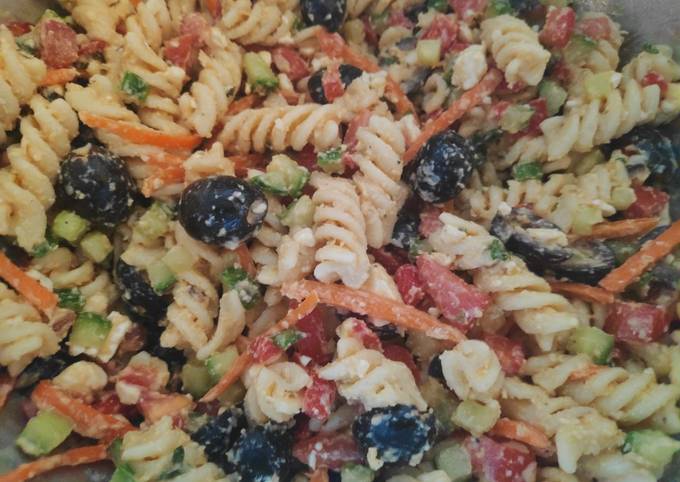 Greek Pasta Salad (Version 2) highly diverse and own mind flavor that unique. Some types of Greek Pasta Salad (Version 2) recipes are also sufficient simple to process and do not take lengthy. Though not everybody likes Greek Pasta Salad (Version 2) food, currently some people are got attached and like the various Greek Pasta Salad (Version 2) foods available. This can be visible from the number of restaurants that provide Greek Pasta Salad (Version 2) as one of the serving. You can have Greek Pasta Salad (Version 2) using 20 ingredients and 4 steps. Here is how you cook that.
Ingredients of Greek Pasta Salad (Version 2)
- It's of Dressing.
- It's 2-3 Tbsp of Dijon Mustard.
- Prepare 1 of Lemon (Juice).
- Prepare 1/2 Cup of Red Wine Vinegar.
- It's 1/2-2/3 Cup of EV Olive Oil.
- You need 4 Cloves of Garlic (Minced).
- Prepare 6 Tbsp of Fresh Parsley (Chopped).
- Prepare 3-4 tsp of Dried Oregano.
- Prepare of Salt (To Taste).
- It's of Pepper (To Taste).
- Prepare 1 tsp of Sugar (Optional).
- It's of Salad.
- It's 1 lb of Rotini Pasta.
- Prepare 2 Cans of Large Black Olives (Whole, Halved, or Sliced).
- It's 1 of Large English Cucumber (Or 2 Small to Medium Ones).
- You need 1-2 Cups of Diced Roma Tomatoes (Seeded) (@ 3 Tomatoes).
- You need 1-2 Cups of Diced Red Bell Peppers (Seeded) (@ 2 Peppers).
- It's 1 Cup of Carrots (Julienned) (Optional).
- Prepare 8 oz of Feta Cheese.
- Prepare 1/2 Cup of Freshly Grated Parmesan Cheese (Optional).
Greek Pasta Salad (Version 2) instructions
- Mix all Dressing Ingredients in a Jar or a Bowl EXCEPT the Olive Oil. Slowly pour in the Olive Oil while whisking. Use as much or as little as it takes to get the desired consistency. Refrigerate..
- Wash and Prep all the Veg. and Cheeses. Cook Pasta according to package directions. Drain Pasta and pour it into a Large Mixing Bowl, and allow it to cool..
- Add all of the Salad Ingredients to the bowl and fold them in. Add the Salad Dressing in and mix until you have the amount you prefer. You may use all of the Dressing. Cover and Refrigerate for at least 1 Hour, though it's best after several hours. Enjoy!.
- You may also use a store bought Dressing, if you don't have these ingredients on hand, or if you just don't want the hassle. My favorite store bought Dressing for this recipe has been Olive Garden Italian Dressing. If I recall correctly, about 12 oz. was the perfect amount for this salad, or around half of the big 24 oz. bottle..
Obtain ingredients for manufacture Greek Pasta Salad (Version 2) recipes is also not hard. You can easily get the main ingredients at the proximate supermarket and even on the market. There are ample types of Greek Pasta Salad (Version 2) that are convenient and quick to process into delicious dishes. You can constantly praxis this Greek Pasta Salad (Version 2) recipe at home, and can provide it to your children and extended family. If you want to cook different foods on our website, we provide sundry types of food recipes which are of certainly very delicious and enjoyable to enjoy, please try they.
Recipe: Tasty Slow Cooker Sweet Potato & Turkey Chili
Slow Cooker Sweet Potato & Turkey Chili.
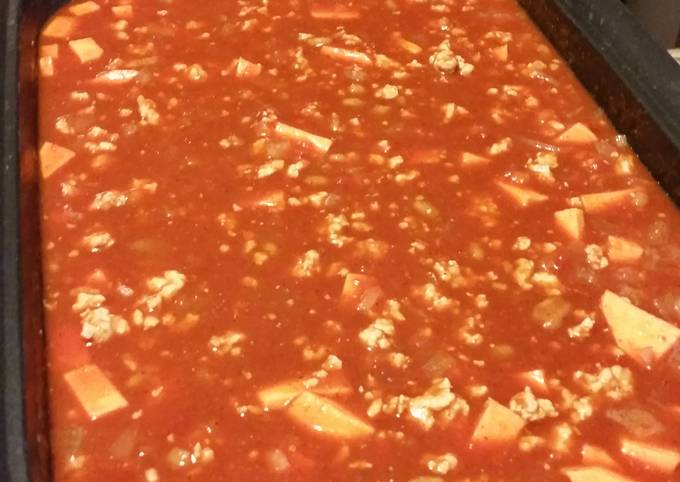 Slow Cooker Sweet Potato & Turkey Chili highly diverse and own ideal taste that unique. Few kinds of Slow Cooker Sweet Potato & Turkey Chili recipes are also sufficient easy to process and do not take lengthy. Even though not everyone likes Slow Cooker Sweet Potato & Turkey Chili food, nowadays several people are get attached and like the sundry Slow Cooker Sweet Potato & Turkey Chili foods on hand. This can be seen than the number of restaurants that prepare Slow Cooker Sweet Potato & Turkey Chili as one of the dish. You can cook Slow Cooker Sweet Potato & Turkey Chili using 12 ingredients and 2 steps. Here is how you achieve it.
Ingredients of Slow Cooker Sweet Potato & Turkey Chili
- It's of ground turkey.
- It's of crushed tomato.
- Prepare of garlic cloves.
- It's of chicken broth.
- It's of sweet potato, cubed.
- Prepare of can baked beans.
- Prepare of chili powder.
- Prepare of cumin.
- Prepare of salt.
- Prepare of pepper.
- You need of paprika.
- You need of onion.
Slow Cooker Sweet Potato & Turkey Chili instructions
- Cook meat and onions until no longer pink. Salt and pepper to taste. Add garlic and cook 30 seconds. Place in slow cooker. Add remaining ingredients to slow cooker. Cook on low 5-6 hours or 3-4 hours on high..
- Garnish with avocado, tortilla chips, jalapeños, or whatever your heart desires..
To get ingredients for making Slow Cooker Sweet Potato & Turkey Chili recipes is also not tough. You can easily get the main ingredients at the proximate supermarket and even on the market. There are ample types of Slow Cooker Sweet Potato & Turkey Chili that are easy and quick to process into delicious dishes. You can always practice this Slow Cooker Sweet Potato & Turkey Chili recipe at home, and can presenting it to your children and extended family. If you want to cook other foods on our website, we provide sundry types of food recipes which are of certainly very delicious and enjoyable to enjoy, please try they.
Recipe: Tasty Braised Goat Meat
Braised Goat Meat.
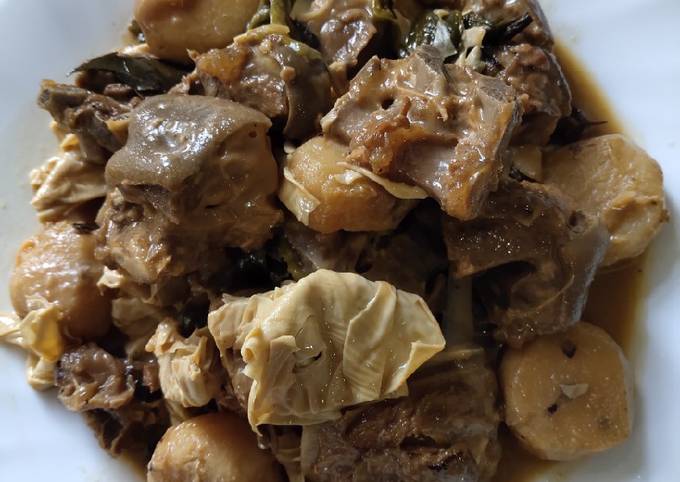 Braised Goat Meat highly diverse and own ideal flavor that unique. Few kinds of Braised Goat Meat recipes are also sufficient easy to process and do not pick up lengthy. Although not everyone likes Braised Goat Meat food, now several people are got attached and like the sundry Braised Goat Meat foods available. This could be seen of the number of restaurants that supply Braised Goat Meat as one of the dish. You can have Braised Goat Meat using 10 ingredients and 2 steps. Here is how you cook that.
Ingredients of Braised Goat Meat
- It's 500 g of goat milk.
- You need 8 of Water chestnut.
- You need sheets of Beancurd.
- Prepare 10 of Ginger slices.
- It's 2 of bay leaf.
- It's of Peppercorns.
- It's 2 stalks of Spring onion.
- You need of Light soy sauce.
- It's 1/3 bowl of Cooking wine.
- You need 1 glass of water.
Braised Goat Meat step by step
- Wash goat meat then dry.Boil water then pour meat.Remove the scums then wash again..
- Heat a wok and add oil then saute ginger peppercorns until aromatic then add the.meat.Keep mixing until the meat turn golden brown.After that pour soy sauce light soy sauce bay leaf spring onion and water chestnutMix well cover and let it boil.Boil for 30 mins then.pour wine beancurd sheets keep simmering.Until meat is tender..
To get ingredients for manufacture Braised Goat Meat recipes is also not hard. You can easily get the main ingredients at the nearest supermarket and even on the market. There are much types of Braised Goat Meat that are convenient and quick to process into delicious serving. You can always praxis this Braised Goat Meat recipe at home, and can presenting it to your children and extended family. If you want to cook different foods on our website, we prepare sundry types of food recipes which are of course very delicious and enjoyable to enjoy, please try their.
Recipe: Yummy Sponge Cake
Sponge Cake. Victoria Sponge Cake Recipe - British Classic - Recipes by Warren Nash. Eggless Sponge Cake Recipes Eggless Sponge Cake Video (In Hindi By Sanjeev Kapoor (student)). We have recipes including a classic Victoria.
 Sponge cakes baked in sheet pans can be filled and rolled before being frosted on the outside. Sponge cake is a light, springy cake made from flour, whisked eggs, and sugar. In the French tradition, sponge cake made by whisking whole eggs is called génoise, while sponge cake made by. Sponge Cake most diverse and have mind flavor that unique. Several kinds of Sponge Cake recipes are also sufficient convenient to process and dont take long. Though not everyone likes Sponge Cake food, currently some people are getting attached and like the various Sponge Cake foods available. This can be seen than the number of restaurants that supply Sponge Cake as one of the serving. You can cook Sponge Cake using 7 ingredients and 17 steps. Here is how you achieve that.
Ingredients of Sponge Cake
- You need 90 grams of Cake flour.
- It's 3 large of eggs if you can.
- It's 70 grams of Granulated Sugar (or Caster Sugar).
- Prepare 10 grams of Butter.
- It's 1 tbsp of Milk.
- Prepare 1 tbsp of Water.
- Prepare 1 of water, add it in ◼︎Spray.
Our sponge cake recipe is foolproof and really easy. With only five ingredients this basic cake recipe just needs your favourite icing and you're sorted. See more ideas about sponge cake, cake, sponge cake recipes. · Feather light sponge cake layered with soft, billowy whipped cream and topped with tangy passion fruit icing. Sponge cake is one of the oldest known sweet goods.
Sponge Cake step by step
- First, measure out the ingredients and sift the flour. Butter the cake pan and dust it with flour (not listed in the ingredients); chill the pan in the fridge. Alternately, or line the pan with kitchen parchment paper cut to size, and stick it to the sides and bottom. Put the * ingredients in the same container, and melt them suspended over a pan of hot water. Preheat the oven to 180 °C..
- (From this point on it's a race against time: you have to finish within 15 minutes.) Crack three eggs that have been returned to room temperature into a bowl. Whip the eggs using a handheld mixer, with the bowl held over a hot water bath, while adding the sugar in 3 batches for 7 to 8 minutes. Make sure that the batter does not become warmer than 40 °C by taking it off the hot water sometimes..
- The batter should reach the point where, when the mixer is listed up, the batter stays in the beater for a while with a thick, fine bubbly texture. This is the first key point. In addition, if the temperature is too high at this point, the gluten in the flour will develop when it's added to the batter later, which will not be good. Before you've finished beating the eggs, place the bowl into cold water to lower the temperature while continue to beat on a low speed setting for 1 minute..
- Add in the listed amount of water to the beaten egg. Since the flour will not mix in well if the beaten egg is too foamy, please make sure to add the water beforehand to make it more liquid. This is the 2nd key point. Whip the mixture very briefly after adding the water. Just swirl your whisk twice..
- Add the pre-sifted flour in two batches. Don't use a rubber spatula. Hold a whisk almost flat on the bowl, move it in between the foam and the flour. Do not stir whatever you do. Keep holding the whisk horizontally as shown, and turn the bowl while scooping the batter straight up and down..
- If you follow this step exactly, then you will not fail. While slipping the flour through openings in the bubbles, mix the batter by scooping it up and dropping the batter back in, fold it onto itself in a cutting motion, and you will be able to do it easily. This is the third key point..
- After mixing in the flour, add in the * butter and milk that have been warmed in a hot water bath by pouring it over the whisk and folding it in. Do this step quickly as well, and make absolutely sure not to stir it around..
- Pour the batter into the pan. Don't pour it in the center, but move the bowl back and forth, and even it out. Finally, if you spot any bits of butter than have not been mixed in, be absolutely sure not to place them into the center. Add them in around the edges of the pan or don't add them in even though it may seem like a waste..
- In order to even out the surface of the batter, and make the bubbles inside uniform, it's often recommend to tap the bottom of the pan to shock them, but do not ever do this. Mist the surface of the batter instead; this moisture will level out the surface. This is the fourth key point..
- Bake for 20 minutes at 170 °C and 10 minutes at 160 °C. Please adjust the baking time according to your household oven, and it is done. Drop the cake while still in the pan from a height of about 30cm. It will shock the cake, remove the heat from the center of the cake all at once by exchanging the air, and keep it from shrinking.
- After removing it from the pan, please remove the paper. This is the paper on the bottom of the cake. It's convenient to have a cheap round grill (the type used for grilling mochi cakes) bought from a 100 yen shop to flip out the cake on to. After flipping the cake upside down, flip it over right side up, and leave to cool..
- Peel off the paper on the sides of the cake cleanly at this point as well. Let it sit as-is until the residual heat subsides naturally, and then put into a plastic bag after it has cooled to keep it from drying out. The sponge will settle and improve if you leave it for a day before decorating it, so make it the day before you plan to serve it..
- I cut it cleanly into three slices. I used a tool called a sponge cake slicer. If you don't have one stick toothpicks into the sponge in four different locations, and use those as a guide, and you can slice the cake nicely..
- This one is made with with 10g less sugar and 19g less flour. The egg foam didn't have a lot of oomph, and didn't hold up well to cutting, so this just sank down while retaining its fluffy texture..
- The sugar not only effects the sweetness, but also effects the whipped egg. This recipe has already reduced the sugar to the bare amount. Changing it even a little will be a cause for failure. If you are afraid the cake will have problems, bake it in a square flat sponge cake pan, and turn it into a rolled cake (using 60g flour, 49g sugar, and 3 eggs)..
- I exchanged 1/3 of the flour for tempura flour (which contains dried egg), to make the cake more golden yellow. It turned into a very soft sponge cake. If you use 100% tempura batter the cake will be very tender, and is probably too delicate to support the weight of any decorations on top. It may be okay if you make the cake one size smaller..
- ■Attention: ■ Regarding the beating times indicated for the egg, please note that they are just a guideline. Make sure that you do not beat it as stiff as you would an egg white meringue, or the sponge will be very dry. You can also try beating the egg at room temperature rather than held over a hot water bath. The baking time is also approximate, please adjust it depending on your oven, observing how well or fast the cake is baking..
Along with angel food cake, it belongs to the category of "foam cakes." It's very popular around the world, probably because of their short list of. The cake is bouncy like a sponge, with the soft and delicate texture resemble cotton when you tear it apart. I also add the cake batter to the dough of the chocolate Japanese milk bread. Browse our fabulously light sponge cake recipes, including the classic Victoria sponge, foolproof chocolate sponge and more. Perfect for afternoon tea, birthday cakes or any time!
Got ingredients for production Sponge Cake recipes is also not tough. You can easily get the main ingredients at the closest supermarket and in fact on the market. There are ample types of Sponge Cake that are simple and fast to process into delicious dish. You can constantly praxis this Sponge Cake recipe at home, and can serve it to your children and extended family. If you want to cook other foods on our website, we provide various types of food recipes which are of certainly very delicious and enjoyable to enjoy, please try they.


No comments :
Post a Comment